Dungeoneering
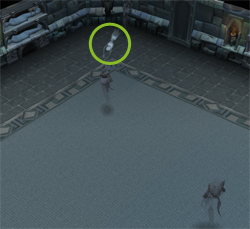
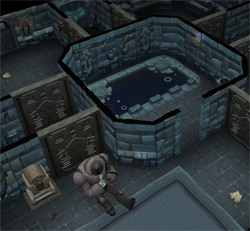
Dungeoneering is a skill in which players explore 47 underground floors beneath Daemonheim, a castle located on a peninsula east of Wilderness. Each floor is made up of different rooms that contain a wide variety of foes to kill and puzzles to solve in order to proceed to the next floor. Each room in a floor will be hidden until you open the doors that lead to that room. Often these doors will require a key which can be found somewhere else on the same floor, and you will often have to use various skills to open doors.
Almost no items can be taken in or out of the dungeons, so you will have to make your own items once inside. There is a banker outside the dungeon which lets you deposit and withdraw items once there.
Unlike other skills, the maximum level in dungeoneering is 120. Players who reach that level will be able to wear a cape of "true skill mastery". A regular cape of skill mastery can still be obtained once a player reaches level 99.
Dungeoneering basics
Travelling to Daemonheim
The only place you can train this skill is in Daemonheim. There are 3 ways to reach Daemonheim:
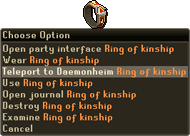
- The fastest way is to use the Ring of kinship, which is given by the Dungeoneering tutor just outside the castle of Daemonheim.
- If you don't have the ring, talk to the Fremennik shipmaster just behind the bank in Al Kharid who will take you there for free.
- It is also possible to go through the Wilderness to get there, although this is a dangerous route.
Starting out
To be able to access the dungeons, you will need to bank all your items except your Ring of kinship (if you don't have one, talk to the Dungeoneering tutor). It is also possible to use the Orb of oculus inside the dungeons.
There are several ways to access a dungeon:
- You can get invited by someone else to join their party. Click the invitation in the chat box and accept it to join the party. You will then have to wait for the party leader to enter the dungeon.
- Open the party interface with your Ring of kinship, and create your own party. You can then invite other players before entering the dungeon, or enter the dungeon straight away through one of the two dungeon entrances.
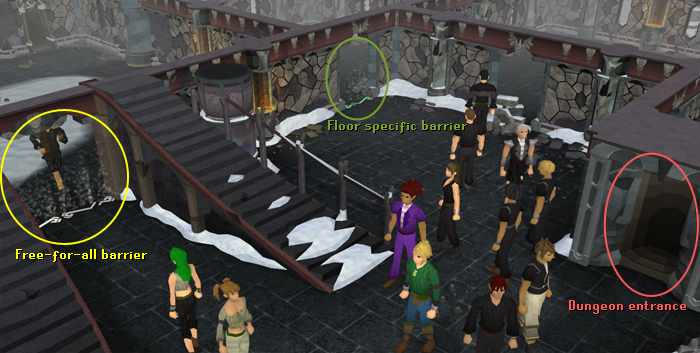
- Pass through one of the energy barriers which automatically groups you with someone else based on total level. If there is nobody to group you with after a certain amount of time, you'll start a party alone.
- The Free-for-all-barrier automatically groups you up with someone else on any floor from 1 to 47
- The Frozen barrier automatically groups you with someone else on floors 1-11
- The Abandoned 1 barrier automatically groups you with someone else on floors 12-17
- The Furnished barrier automatically groups you with someone else on floors 18-29
- The Abandoned 2 barrier automatically groups you with someone else on floors 30-35
Note: When in a party with other players, if you disconnect or need to log out you can still get back into the raid. Simply click your ring and click rejoin party and then type in a name of one of the other party members. This does not work if you were alone or the party has completed the floor without you.
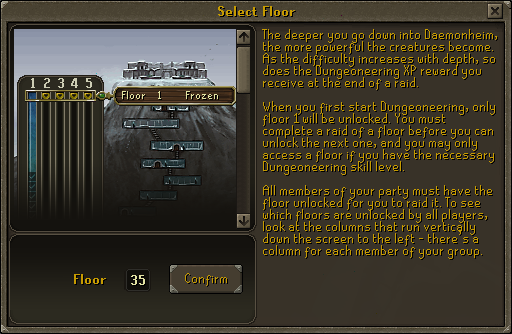
Floors
There is a total of 47 floors underneath Daemonheim. You can only access floors which are equal to half your dungeoneering level (rounded down) or less. Also, you must play through a floor to be able to access the next.
For example, to access floor 17, you need a Dungeoneering level of at least level 36 (36/2=17) and you must have completed floor 16 at least once.
Floor 1 is closest to the surface, floor 2 is below that, all the way down to floor 47. As you go deeper, you gain more XP, but the monsters become more powerful.
If someone in your party doesn't have the required level to proceed to the next floor, the floor will be repeated until everyone can proceed to the next floor.
Complexity
The complexity determines what the players start with once inside the dungeon, as well as which skills can be used. You should always play at the highest complexity possible to maximize your XP. Both free players and members can access all complexity levels, but only members can use members-only skills.
When you complete a floor at a lower complexity, you will always play at the next complexity on the next floor. The different complexities do not have level requirements, but to play at a higher complexity you need to have completed floors at all the lower complexities at least once.
On all complexities, there will be food on the tables in the starting room. On complexity 1-2 you will start with weapon and armour for all combat styles in your inventory. On complexity 3, you will only have armour and there will be random weapons on the tables. On complexity 4-6 you will start with an empty inventory, but you'll find random weapons and armour on the tables.
| Complexity 1 | Complexity 2 | Complexity 3 | Complexity 4 | Complexity 5 | Complexity 6 | |
|---|---|---|---|---|---|---|
| XP Penalty | 50% | 45% | 40% | 35% | 30% | 0% |
| Skills used | All Combat skills except summoning (including Magic, Ranged and Prayer) | |||||
| - | Cooking, Firemaking, Fishing, Woodcutting | |||||
| - | Smithing (weapons only), Mining, Runecrafting | |||||
| - | Smithing (all items), Crafting, Farming Textiles, Hunting | |||||
| - | Farming Seeds, Herblore, Thieving, Summoning | |||||
Inside the dungeon
When you enter the dungeon, you will be in a room which provides food (and weapons/armour on higher complexities). At complexities 3+, there will be a furnace and anvils in the room that can be used for Smithing and a Runecrafting altar, as well as a spinning wheel. At complexities 5 and 6 there will be a water trough which members can use to fill vials of water to make potions and a summoning obelisk that members can use to infuse summoning pouches.
There will also be a smuggler who you can sell your items too but he will also sell you items depending on the complexity. You can also use any items found inside the dungeon with the smuggler, and he will give you information about it. Once you find the boss, it is possible to ask the smuggler about it and he will give you information about it.
Every room in the dungeon will have one to four doors leading to other rooms. Some of the doors require a key to open, so remember to pick up any keys you find while you're exploring the dungeon.
Binding items
It is possible right-click an item and select 'bind' on items you obtain inside the dungeon. Once bound, the item will appear in your inventory every time you start a new dungeon. It is a good idea to bind the best weapon you've found so that you always have a good weapon at the start of the dungeon. You cannot sell bound items to the smuggler, and they can not be traded with other players. To un-bind an item, right-click on the item and select "destroy".
Note: If you bind a members-only item, it will not appear in your inventory when you play on a free world, but it will still count towards the total. To unbind a members-only item, you need to log in to a member world and unbind it there.
| Dungeoneering level | Items you can bind |
|---|---|
| 1 | 1 |
| 50 | 2 |
| 100 | 3 |
| 120 | 4 |
In addition you can bind up to 125 of one set of runes or arrows. This does not count towards the max possible bound items.
Prestige and XP calculation
You get dungeoneering XP after you beat the boss and exit through the ladder. There will be a summary screen which will show you how much XP you earned in that dungeon.
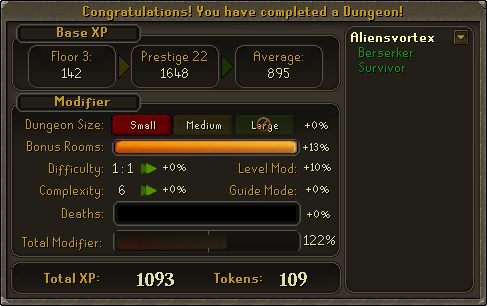
The total XP you earn will be the final XP calculated after adding percentages to the base XP. You will also get one token for every 10 XP you get, which can be used to buy dungeoneering rewards. The number of tokens you get is always rounded down, so if you get 19 XP, then you'll only get 1 token.
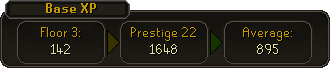
Base XP
Your base XP is calculated as the average of two values, the floor XP and prestige XP. Both are calculated using the same formula. For example, if you're on floor 6 with prestige 6, both numbers will be identical.
The following values affect your base XP:
- Floor/prestige number. This is the most important factor.
- Percentage of visited rooms: fewer visited rooms will gives a lower base XP
- Complexity level - a lower complexity level gives lower base XP
How to get prestige
Prestige in a nutshell:
Getting prestige is crucial to maximize the XP you gain. This prestige bonus is based on how many different floors you have completed before.
You only get prestige if you haven't completed the floor before. You'll get 0 prestige XP if you've already completed the floor. Once you've completed every floor you can access, use the "reset" option on the ring and all floors will be set to "undone" and you'll be able to start again from floor 1, maintaining your prestige.
How prestige works
The prestige number is the highest of two possible values (as shown in the ring's party interface):
- Your current progress
- Your previous progress
The higher this number is, the more prestige XP you'll get (just like floor XP).
You've done floor 1 to 5. As you begin floor 6, you'll see in your ring interface that your current progress is 5. Once you complete floor 6, you'll get prestige 6 because that's your new current progress. However, if you now do floor 6 again, you will not get prestige at all. If you are unable to proceed to room 7, then you should leave your party and press "Reset" in your ring interface.
When picking floors, the floors which you have already done, and therefore are unable to get prestige on again, are the ones with checkmarks on them. In the picture above, the player still needs to do floors 1 to 8 but has floors 9+ checkmarked.
What happens when I reset?
- All floors will be set to "undone" so that you will get prestige XP from all of them
- Your prestige level gets locked at your current progress.
With the example from above, you have prestige 6. You reset and start again from floor 1. You will still have prestige 6 when you do floor 1, 2, 3, 4, 5 and 6. However, when you've done all floors from 1 to 6 and go to floor 7, then your prestige will be 7.
XP modifiers
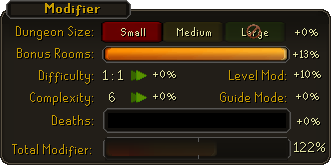
Modifiers increase or decrease your base XP by a certain percentage, all of which are shown in the XP summary:
- Dungeon size: If you're in a small dungeon, this will be zero. If you're in a group party, however, the party leader can choose a medium or large dungeon, which will give bonus XP.
- Bonus rooms: Not all rooms must be unlocked in order to reach the boss, however, you will get additional XP if you unlock more rooms. This will be 0 if you unlock no additional rooms, and 13% if you unlock all rooms.
- Difficulty: Only affects group parties. The bigger the party, the bigger the modifier.
- Level Mod: Affected by how many creatures you left alive in the dungeon. Note that the non-aggressive hunter monsters do not count towards the Level Mod.
- Complexity: When playing lower complexities than 6, there will be a penalty, displayed here. See the complexity section for details.
Puzzles
| Image | Description |
|---|---|
 | Ferret fishing/Ferret on an island
Required skills: Cooking, Fishing, Ranged The goal in this puzzle is to make the ferret walk onto the pressure plate in the opposite corner.
|
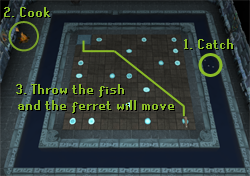
 | Ferret huntingRequired skills: Hunter, Woodcutting, FletchingRequired items: Hatchet, Knife The aim here is to catch the ferret. There are two ways to go about this. A. This is always the fastest way when in a group but varies when alone.
If not many people have a high enough hunter level then try to make the ferret approach them. B. The simpler way but more often than not it will take longer.
|
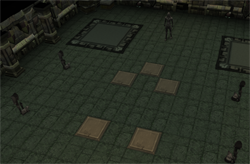
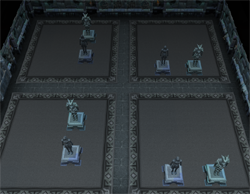 | Sliding statues
Requirements: None Do not mirror the statues - simply copy their position. A solved sliding statues puzzle is shown in the picture. |
 | Combat triangle statues
Required skills: Crafting, Mining
|
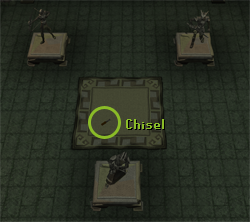
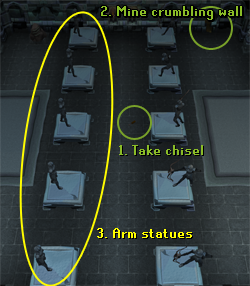 | 10 statue weapons (2 rows of statues)
Required skills: Crafting, Mining
If you don't arm the statues with the correct weapons, you will have to try again until you get it right. As you may fail when crafting the rocks, destroying the rock in the progress, stand by the crumbling wall when crafting the weapons to save running back and forth. Tip: Drop the chisel once you're done to save inventory space. |
 | Follow the leaderIn this room the number of statues corresponds with the number of players in the party. Each player has to stand on a separate tile to activate the statues. Once activated, they will perform an emote which you then have to copy. The emotes must be copied successfully three times in a row to complete the puzzle. |
 | "Invincible" ghostsRequirements: None The room has several ghosts which do not take damage. One of the ghosts has a spirit, which allows you to kill that ghost. You can see the spirit flying into another ghost from time to time (highlighted in the picture), so always follow the spirit to kill the ghost with the spirit. Once one ghost is killed, the spirit will fly into the ghost closest to it. |
 | Crystal / Converging lightsRequired Skills: Magic The goal is to make all the 4 converging lights reach the middle at the same time. Before you start, power up inactive lodestones (shown on the right in this picture). Then, step onto the pressure pads to pause the lights, and release the pad to start them again. Alternatively, if you're in a party with several people, you can also pause the lights at the middle, which will also solve the puzzle. |
 | MonolithClick on the monolith to start charging it. Mysterious shades will spawn periodically, attacking the monolith and lowering its charges. Attack the shades to change their target to you and kill them as quickly as possible. Once the monolith is fully charged any remaining shades will disappear. |
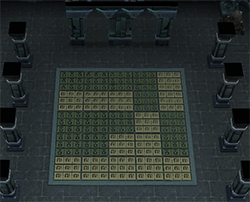 | Imbue white and green tilesRequired skills: Runecrafting The room has 5x5 tiles, and you need to get all of them the same colour (either white or green). You can solve this just by trying to get as many as possible the same colour, and then force the remaining tiles. There will always be at least one way to solve it without forcing the tiles, but once you've forced a tile you might not be able to solve the rest the normal way (which means that you'll also have to force the rest). |
 | Damaged constructRequired skills: Crafting, Runecrafting, Magic Required items: Pickaxe, Hammer, Chisel (found on the ground)
|
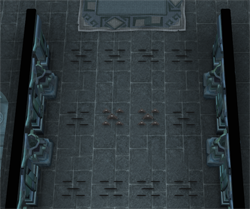
 | 5 switchesRequirements: None There are 5 switches (4 pictured) that have to be pulled within a short amount of time, depending on how big your party is. If you're alone, you can easily do all of them. If you have a larger party, everyone needs to be assigned to some of the switches. Everybody should pull the switches at the same time, and then the remaining switches should be pulled by those who are closest to them. |
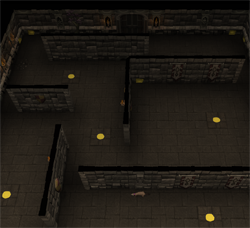
 | Suspicious groovesRequirements: None There are 3 rows of 4 suspicious grooves. 3 of the 4 grooves on each rows are traps. Make your way through by trial and error. |
 | Enigmatic Hoardstalker riddler
Required Skills: Summoning, Thieving A list of possible riddles and their answers is listed in the Enigmatic Hoardstalker section below. |
 | Icy room with 4 buttonsSlide across the room to stand on the four buttons. Obstacles can be used and it is possible to slide diagonally. |
 | Coloured ferretsThere are 5 coloured ferrets and 5 coloured pressure plates. Each ferret's colour matches a pressure plate's colour. The goal is to move each ferret to the corresponding pressure plate. The ferret will always try to be at least 3 squares away from you. Use this to get them to move to the correct pressure plates. Once they are in place, the will not move again. Try avoiding trapping the ferrets against a wall; if you do, scare the ferret to make it move away from the wall. |
 | Seeker sentinelThe goal is to get through the room without being seen. The seekers patrolling the room can be hit when not facing you, temporarily immobilizing them. There is also a seeker in the middle which turns around slowly. There are four walls which can be used to hide from the seekers. Simply wait until no seekers are facing you and hit the seeker patrolling nearby and then run to the next wall. Repeat this until you reach the door needed. |
 | MazeThe aim of this puzzle is to reach the middle of the maze before the timer runs out. Start the timer by pulling the switch and then make your way towards the middle. Once the timer runs out a toxic gas is released which can only be stopped by opening the chest in the middle of the maze. It is possible to simply move to the next room without entering the middle but this will mean you will get damaged every time you need to pass through the room. |
 | Lodestone and pillarsRequired Skills: AgilityRequired Items: Lodestone (found on the ground) To complete this puzzle pick up the lodestone and start at one corner of the pillars. Then move to the opposite corner and place the lodestone on the crystal. Move horizontally first to distance yourself from the sphere, if the sphere catches you, you will be damaged and moved back to the start. When attempting to jump from pillar to pillar it is possible to stumble, allowing the sphere to move closer. In most cases this makes getting to the other side impossible. |
 | Agility mazeRequired Skills: AgilityIn this room the aim is to pass all the agility obstacles and opening the doors to allow the rest of the party to go through the room. Pass through the obstacles and open the doors, allowing you easier access if needing to travel through the room again. |
 | Barrel puzzle
Required Skills: Construction, Strength Tip: Have one person on each side of the barrel, allowing the barrel to be pushed faster when the pipe changes. |
 | Sleeping guardsRequired Skills: Agility The aim in this room is to steal the guards' keys and use them to unlock the door. The room is littered with trash and to avoid waking the guards up you have to walk over it instead of running. If the guards wake up, try to run back out of the room as fast as possible to avoid getting trapped. Then kill the guards for the keys. |
 | Mining roomRequired skills: Mining, Construction Required items: Pickaxe, Hammer Mine through the rubble to get to the next room. However to ensure that rubble doesn't keep falling from the ceiling, repair the support pillars on the sides of the path. Falling rubble can cause very high damage so be sure to have food available. |
 | The Fremennik ScoutRequired Skills: Cooking, Smithing, Fletching Required items: Hammer (provided by scout), Knife (provided by scout) In this room the Fremennik Scout needs help to smith weapons, fletch bows and arrows and to cook food before he allows you to pass. Simply click on the crates containing the raw materials to complete the puzzle. |
The Enigmatic Hoardstalker Riddles
| Riddle | Item | Location |
|---|---|---|
| A serpent am I, yet on land I would die. | Dusk, Short-finned or Salve Eel | Table |
| Born through fire, I'm lost in winds and muddied in water. | Ashes | Ground |
| Completed I can make you dead, but currently I have no head. | Headless arrows | Table |
| From your veins I flow, from essence did I grow. | Blood rune | Chest |
| I am cursed with but one eye. And from Haystacks I will spy. | Needle | Chest |
| I am water that brings fire to your heart. | Firebreath whiskey | Barrel |
| I can get you almost anything you want, but with no one to accept me, I am worthless. | Coins | Chest |
| I demonstrate faith in a dark god. | Unholy symbol | Chest |
| I pluck the denizens of the sea, to serve a salty sailor's tea. | Fly fishing rod | Chest |
| Remove my yellow skin, and dine on me within. | Banana | Barrel |
| Sticks and stones may break me, exercise may ache me. | Bones | Ground |
| The blunt force I provide is surprisingly constructive. | Hammer | Table |
| The slowest of assassins I'm at your home I'm your blade or your drink. | Weapon poison | Barrel |
| Though I'm light, I can not illuminate the dark. | Feather | Table |
| Though my friends fly high,I was always destined to protect. | Novite kiteshield | Ground |
| While many call me mould, some call me savoury. | Edicap or Gissel mushroom | Barrel |
| Without me you would perish, but fill a room with me and you would surely die. | Vial of water | Barrel |
| Without me, a deathslinger is merely a gorajo with a stick. | Bowstring | Table |
"Lights Out" (imbue tiles) puzzle solver
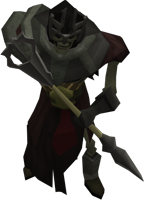
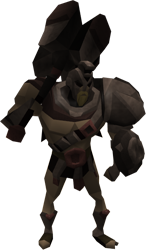
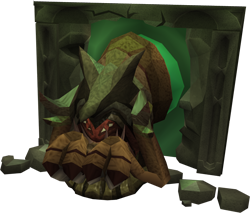
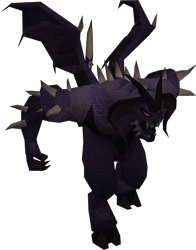
Bosses
| Image | Level required | Description |
|---|---|---|
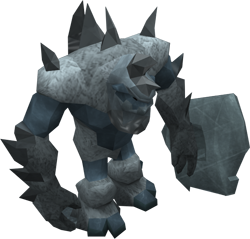
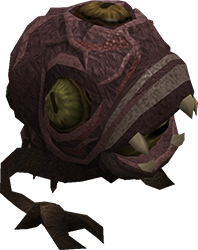
 | 1 | Gluttonous BehemothUses a combination of ranged, magic and melee attacks. It has the ability to eat from the carcasses in the room. If you're in a single player dungeon, there will be one carcass, while in a team dungeon there will be two. Stand between the Behemoth and the carcasses to prevent it from eating and healing. If you're in a team dungeon, and the other members leave, leaving you alone, it is impossible to beat the behemoth as it will always heal from one of the carcasses. Although it constantly heals, it can not be used for combat training as the experience given when fighting it is lower than usual. |
 | 1 | Astea FrostwebUses magic based attack and will occasionally freeze you, preventing you from moving. Also summons ice spiders, which use melee based attacks. She alternates between being fully protected from melee, ranged and magic every 20 seconds. When she is protected from the attack style you use, you can switch to a different attack style or kill the spiders. Protect from magic is effective against her, but she will summon more spiders if you use it. |
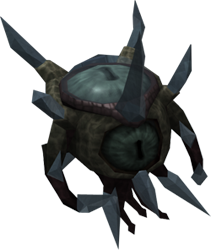
 | 1 | Icy BonesUses ranged and melee attacks. His special attack will cause ice stalagmites to rise from the ground, harming anyone who doesn't stand immediately next to him. Therefore, it is advised, even for rangers and mages, to stand just next to him to avoid getting hit too much by the stalagmites. Using protect from melee prayer will help in this fight. |
 | 5 | Luminescent icefiendAccording to the smuggler, the icefiend uses magic and ranged attacks with equal proficiency. Its special attack makes icicles fall on you, and is extremely powerful. The special attack begins when the icefiend encases itself in ice, and you see something elevates from it. To avoid its special attack, run around until the attack ceases (preferably in circles to avoid running where you've already been). If you get hit, you will lose a lot of life points, but never enough to kill you (although the icefiend's regular attack following it might kill you). |
 | 11 | Plane-freezer LakhrahnazStrong against magic and range attack, weak against melee. However, he is in an ice-covered room which makes it hard for melee fighters to move around. It will occasionally push players backwards, so just slide back to it and continue fighting. It uses a mix of ranged, magic and melee attacks. It is effective for members to use a melee summon, which will not be affected by the ice. |
 | 17 | To'Kash the BloodchillerUses melee and magic attacks. Weak against magic, especially fire based spells. Its special attack will encase you in ice. To'Kash will then break the ice, dealing somewhat high damage in the process. If you're part of a team, a team member can break you free from the ice, which will not deal any damage at all and help you save food. It may also drain your prayer points, but only if you are using a protection prayer, so you can still use other prayers without having it drained. Before he uses the prayer drain attack, he will say "I will shatter your soul!" |
 | 23 | Skeletal HordeThere is a divine skinweaver which will heal you as long as you stand on the pad around her. Skeletal mages, rangers (throwers) and warriors will emerge from the holes in the wall. Kill them until the skinweaver tells you to block the tunnels. When you're told to, block one of the tunnels, and continue fighting the skeletons. If you block the tunnels before you're told to, you'll take damage. Block the next tunnel once the skinweaver tells you to, and continue until all tunnels are blocked and all skeletons are dead. Talk to the skinweaver before you leave the room. Tips: Use the protect from range prayer and focus on killing the other types of skeletons. Try staying around the skinweaver as much as possible if you're taking high hits. The longer you stay around the skinweaver, the more you'll be healed. |
 | 23 | Hobgoblin GeomancerUses magic based attacks, including snare, weakening spells and earth blasts. The latter can hit several team members at once. You should fight him without prayer. Using any form of prayer may result in the geomancer disabling your prayer, healing himself in the process. This boss is relatively easy, but getting snared can be annoying for melee warriors as you will not be able to move in 12 seconds. Bringing a ranged weapon and ammo is a good alternative when snared. |
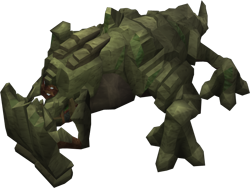 | 23 | Bulwark beastThe Bulwark beast has a thick armour which you need to break through before you are able to damage the beast. Use a pickaxe to break through the armour. The better pickaxe you have, the faster you'll break the armour. Once the armour is gone, kill it with a normal weapon. Alternatively, use magic against it. Magic will hit through the armour, so you won't have to break it first. |
 | 29 | Unholy cursebearerUses both magic and melee based attacks. Slowly lowers all your combat stats except prayer. You can recharge your stats at the unholy fonts on either sides of the ladder, but this will restore about 1/8th of the cursebearer's life points. |
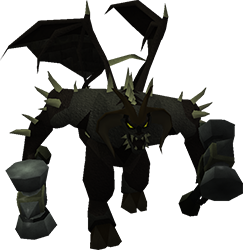
 | 35 | RammernautRammernaut only uses melee, but will use a strong attack to disable the protect from melee prayer if you try to use it, so you need to fight it without the prayer. Rammernaut has a ram attack, which can deal high damage. Before doing this attack, Rammernaut will shout "Chaaaaaarge!". If you stand next to a wall before he charges, you can dodge his attack by moving away from the wall, resulting in Rammernaut ramming the wall (but he will not take any damage). Since he only does melee damage, good melee armour is highly advised. Rammernaut is extremely weak to magic attacks and should always be the style of combat used against him. |
 | 35 | StompWhen fighting Stomp, he will shoot a large beam from his mouth at least 3 times (when its life points reaches 2/3 of max, 1/3 of max and 1), making rocks and crystals fall from the roof. Pick up the crystals and use them to power up the lodestones. The rocks may block the lodestones or the way to the crystals, which will let Stomp heal and prolong the fight. You can see where the rocks will fall when the shadows appear. You can prevent a rock from falling to a specific spot by standing there, although you will take some damage. |
 | 35 | Har'Lakk the RiftsplitterUses mage and melee, with mage hitting highest. The mage attack will also drain your prayer. Using protect from magic will prevent the magic from hitting, but your prayer will still be drained. Has an extremely strong special attack which will let a "rain" of small portals appear, causing high damage. Just before the portals appear, Har'Lakk will say one of three phrases, depending on which portal will appear:
|
 | 39 | Lexicus RunewrightDespite looking like an easy boss, Lexicus deals a lot of damage, so be sure to bring plenty of food. To begin with, Lexicus will reflect about 1/3 of the melee damage you deal back at you, so it might be a good idea to use mage or ranged (the latter being the most effective). Lexicus regularly summons books which will attack you. Time could be taken to kill these as they have nearly no defence at all, but can hit very high. His hardest attack is "book barrage", in which he sends several glowing books which will explode at the position you had when he sent them. Be sure to run away from your spot when he uses the attack, otherwise the books will explode and potentially deal over 600 damage! Using protect from mage will help in the fight. |
 | 45 | SagittareSagittare is a ranger who also uses magic. He uses protect from ranged, so your best option is to use melee (magic is ineffective). He has 3 special attacks:
|
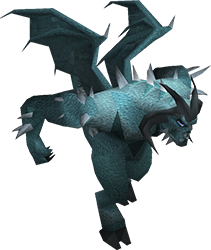
 | 51 | Night-gazer KhighorahkUses a magic attack and has a melee special attack where it forms a blue sphere around itself and then slams down on the ground potentially hitting 600+. Protect from magic will block the magic attack and the special attack is only within melee range so just walk one step away when the sphere is formed. To be able to hit the Night-gazer, at least one of the four pillars in the corners of the room must be lit. The more pillars are lit, the more damage you can do. You will have to keep relighting them regularly as they often go out. Once the Night-gazer has been killed, it spawns a weaker version of itself which you have to kill but the pillars stay lit. |
 | 59 | Shadow-forger IhlakhizanUses 4 different attacks, with magic being the most powerful so use the protect from magic prayer.
|
 | 65 | Bal'lak the PummellerBal'lak uses all three types of attack but will only use melee against the player he is currently focusing on. A meter at the top of the screen displays Bal'laks defence which will keep rising unless he stands within one square of the green portals that he summons. Bal'lak will regularly summon these portals and they must be avoided. If standing within one square of them, the portal deals rapid damage. The easiest way to kill Bal'lak is too turn on any boosting prayers and use potions in the beginning of the fight as that is when Bal'lak's defence will be lowest. He will only focus on one player throughout the whole fight until they die so the tank is responsible for luring Bal'lak to the portals. This needs to be done quickly to ensure that his defence doesn't get too high, making the fight longer and longer. Keep your lifepoints high as the portals can rapidly deal high amounts of damage. |
Rewards
Every time you complete a dungeon, you will get tokens, which can be used to purchase rewards from the rewards trader near the teleport spot (when you use the Teleport to Daemonheim option on the Ring of Kinship). The number of tokens you get is equal to 1/10th of the Dungeoneering XP you get, rounded down. For example, if you get 596 Dungeoneering XP, you will get 59 tokens.
The rewards can only be used outside the dungeons of Daemonheim.
List of rewards
| Image | Item | Token cost | Reqs. | Information |
|---|---|---|---|---|
 | Gem bag | 2,000 | 25  | Holds up to 100 uncut gems (sapphires, emeralds, rubies and diamonds). |
 | Coal bag | 4,000 | – | Holds up to 27 pieces of coal. Coal in the bag will be used before the coal in your inventory when smithing or superheating. |
 | Arcance pulse necklace | 6,500 | 30 30  | Boosts magic damage by 5% when worn, and has a +10 magic attack bonus. |
 | Scroll of life  | 10,000 | 25 25  | Once used, you permanently get a 10% chance of getting seeds back when clearing dead farming patches and a 5% chance of getting a tree seed back from dead trees. |
 | Longbow sight | 10,000 | 30 45/55  | Can be used with a Maple longbow or Magic longbow. Will enhance the bow's ranged abilities. It can be removed from the bow at any time. See stats in the equipment section below. |
 | Nature staff | 10,000 | 40 53 40  | Stores up to 1000 runes (not included when bought). When casting a spell that uses nature runes, there's a 1/10 chance that the rune will not be used. |
 | Law staff | 12,000 | 40 53 40 | Stores up to 1000 runes (not included when bought). When casting a spell that uses law runes, there's a 1/10 chance that the rune will not be used. |
 | Arcance blast necklace | 15,000 | 50 50 | Boosts magic damage by 10% when worn, and has a +12 magic attack bonus. |
 | Arcane stream necklace | 30,000 | 70 70 | Boosts magic damage by 15% when worn, and has a +14 magic attack bonus. |
 | Bonecrusher | 34,000 | 21 21  | If you have a bonecrusher in your inventory, dropped bones from monster kills will automatically be converted into Prayer XP. |
 | Gravite rapier | 40,000 | 25 | A strong weapon, but must be recharged after 10 hours in combat (see below for more info). |
 | Gravite longsword | 40,000 | 45 45 | A strong weapon, but must be recharged after 10 hours in combat (see below for more info). |
 | Gravite 2h sword | 40,000 | 45 45 | A strong weapon, but must be recharged after 10 hours in combat (see below for more info). |
 | Gravite staff | 40,000 | 45 45 | A powerful staff, but must be recharged after 10 hours in combat (see below for more info). |
 | Gravite shortbow | 40,000 | 45 45 | A strong bow, but must be recharged after 10 hours in combat (see below for more info). |
 | Tome of frost | 43,000 | 48 48 | Gives an infinite supply of water runes when worn in the offhand (shield) slot. |
 | Anti-poison totem | 44,000 | 60 45  70  | You cannot get poisoned while wielding the totem (shield slot). However, it will not remove existing poison effects. |
 | Mercenary's gloves | 48,000 | 73 73 | Provide a +13 ranged attack bonus when worn. |
 | Scroll of renewal | 107,000 | 65 65 | Once used, you will permanently gain the ability to use the Rapid Renewal prayer, which restores life points at a 5x rate. |
 | Scroll of augury | 153,000 | 77 77 | Once used, you will permanently gain the ability to use the Augury prayer, which boosts your magical attack by 20% and magical defence by 25%. |
 | Chaotic rapier | 200,000 | 80 80 | A strong weapon, but must be recharged after 10 hours in combat (see below for more info). |
 | Chaotic longsword | 200,000 | 80 80 | A strong weapon, but must be recharged after 10 hours in combat (see below for more info). |
 | Chaotic maul | 200,000 | 80 80 | A strong weapon, but must be recharged after 10 hours in combat (see below for more info). |
 | Chaotic staff | 200,000 | 80 80 | A powerful staff which gives a +15% damage bonus, but must be recharged after 10 hours in combat (see below for more info). |
 | Chaotic crossbow | 200,000 | 80 80 | A powerful crossbow which can fire up to rune bolts, but must be recharged after 10 hours in combat (see below for more info). |
 | Chaotic kiteshield | 200,000 | 80 80 | 'Soaks' up 10% of all melee damage or 20% of all ranged damage that would have hit for 200 lp or more. Must be recharged after 10 hours in combat. |
 | Eagle-eye kiteshield | 200,000 | 80 80 | 'Soaks' up 10% of all ranged damage or 20% of all magic damage that would have hit for 200 lp or more. Must be recharged after 10 hours in combat. |
 | Farseer kiteshield | 200,000 | 80 80 | 'Soaks' up 10% of all magic damage or 20% of all melee damage that would have hit for 200 lp or more. Must be recharged after 10 hours in combat. |
Equippable items
Sighted longbows
By adding a longbow sight to a Maple longbow or Magic longbow, you will get a Maple longbow (sighted) or Magic longbow (sighted), respectively. This will enhance the bow's ranged abilities. The sight can be removed and added to another bow if desired.
| Image | Item | Ranged attack bonus |
|---|---|---|
 | Maple longbow (sighted) | + 110 |
 | Magic longbow (sighted) | + 140 |
Arcane necklaces
The arcane necklaces will boost your magic attack bonuses and the magic damage you deal as long as you wear the necklace.
| Image | Item | Dmg. boost | Attack bonuses | Defence bonuses | Other | ||||||||||
|---|---|---|---|---|---|---|---|---|---|---|---|---|---|---|---|
| Stab | Slash | Crush | Magic | Range | Stab | Slash | Crush | Magic | Range | Summon | Strength | Prayer | |||
| Arcane pulse necklace | 5% | +0 | +0 | +0 | +10 | +0 | +0 | +0 | +0 | +0 | +0 | +0 | +0 | +0 |
| Arcane blast necklace | 10% | +0 | +0 | +0 | +12 | +0 | +0 | +0 | +0 | +0 | +0 | +0 | +0 | +0 |
| Arcane stream necklace | 15% | +0 | +0 | +0 | +14 | +0 | +0 | +0 | +0 | +0 | +0 | +0 | +0 | +0 |
Nature and law staves
The nature and law staves store up to 1000 runes (not included when bought). When casting a spell that uses law runes, there's a 1/10 chance that the rune will not be used. Note that the benefit from using the nature and law staves is quite small, as you still have to buy all the runes and you will lose the ability to use an elemental staff.
| Image | Item | Attack bonuses | Defence bonuses | Other | ||||||||||
|---|---|---|---|---|---|---|---|---|---|---|---|---|---|---|
| Stab | Slash | Crush | Magic | Range | Stab | Slash | Crush | Magic | Range | Summon | Strength | Prayer | ||
| Nature staff | +7 | -1 | +28 | +10 | +0 | +2 | +3 | +1 | +10 | +0 | +0 | +35 | +0 |
| Law staff | +7 | -1 | +28 | +10 | +0 | +2 | +3 | +1 | +10 | +0 | +0 | +35 | +0 |
Gravite weapons
A fully recharged gravite weapon will last 10 hours in combat. When you buy it, it start at 20% charge. Once you've used up the charges, you will have to recharge it before you can continue using it.
The rewards trader will recharge your gravite weapon for a fee. For a weapon with no charge at all, a repair will cost up to 1 million gp. If you choose to combine cash and tokens to pay for the reward, it will cost you up to 100,000 gp and a number of tokens.
- The gravite staff also has a +5% damage bonus.
- The gravite shortbow can fire up to adamant arrows.
| Image | Item | Attack bonuses | Defence bonuses | Other | ||||||||||
|---|---|---|---|---|---|---|---|---|---|---|---|---|---|---|
| Stab | Slash | Crush | Magic | Range | Stab | Slash | Crush | Magic | Range | Summon | Strength | Prayer | ||
| Gravite rapier | +50 | +9 | -3 | +0 | +0 | +0 | +1 | +0 | +0 | +0 | +0 | +48 | +0 |
| Gravite longsword | +45 | +63 | -3 | +0 | +0 | +0 | +3 | +2 | +0 | +0 | +0 | +62 | +0 |
| Gravite 2h sword | -4 | -4 | +87 | -4 | +0 | +0 | +0 | +0 | +0 | -1 | +0 | +90 | +0 |
| Gravite staff | -1 | -1 | +15 | +15 | +0 | +2 | +3 | +1 | +15 | +0 | +0 | +7 | +0 |
| Gravite shortbow | +0 | +0 | +0 | +0 | +40 | +0 | +0 | +0 | +0 | +0 | +0 | +0 | +0 |
Tome of frost
The tome of frost gives an infinite supply of water runes when worn in the offhand (shield) slot.
| Image | Item | Attack bonuses | Defence bonuses | Other | ||||||||||
|---|---|---|---|---|---|---|---|---|---|---|---|---|---|---|
| Stab | Slash | Crush | Magic | Range | Stab | Slash | Crush | Magic | Range | Summon | Strength | Prayer | ||
| Tome of frost | +0 | +0 | +0 | +10 | +0 | +0 | +0 | +0 | +10 | +0 | +0 | +0 | +0 |
Anti-poison totem (members only)
You cannot get poisoned while wielding the totem. However, it will not remove existing poison effects if you wield it while already poisoned.
| Image | Item | Attack bonuses | Defence bonuses | Other | ||||||||||
|---|---|---|---|---|---|---|---|---|---|---|---|---|---|---|
| Stab | Slash | Crush | Magic | Range | Stab | Slash | Crush | Magic | Range | Summon | Strength | Prayer | ||
| Anti-poison totem | +0 | +0 | +0 | +0 | +0 | +40 | +35 | +30 | +5 | +40 | +50 | +0 | +0 |
Mercenary's gloves (members only)
Provide a +13 ranged attack bonus when worn.
| Image | Item | Attack bonuses | Defence bonuses | Other | ||||||||||
|---|---|---|---|---|---|---|---|---|---|---|---|---|---|---|
| Stab | Slash | Crush | Magic | Range | Stab | Slash | Crush | Magic | Range | Summon | Strength | Prayer | ||
| Mercenary's gloves | +0 | +0 | +0 | -10 | +13 | +6 | +5 | +7 | +8 | +0 | +6 | +0 | +0 |
Chaotic weapons (members only)
A fully recharged chaotic weapon will last 10 hours in combat. When you buy it, it start at 20% charge. Once you've used up the charges, you will have to recharge it before you can continue using it.
The rewards trader will recharge your gravite weapon for a fee. For a weapon with no charge at all, a repair will cost up to 2 million gp. If you choose to combine cash and tokens to pay for the reward, it will cost you up to 200,000 gp and a number of tokens.
- The chaotic staff also has a +15% damage bonus.
- The chaotic shortbow can fire up to rune arrows.
| Image | Item | Attack bonuses | Defence bonuses | Other | ||||||||||
|---|---|---|---|---|---|---|---|---|---|---|---|---|---|---|
| Stab | Slash | Crush | Magic | Range | Stab | Slash | Crush | Magic | Range | Summon | Strength | Prayer | ||
| Chaotic rapier | +94 | +78 | -2 | +0 | +0 | +0 | +0 | +0 | +0 | +0 | +0 | +101 | +0 |
| Chaotic longsword | +107 | +124 | -2 | +0 | +0 | +0 | +0 | +0 | +0 | +0 | +0 | +120 | +0 |
| Chaotic maul | -4 | -4 | +167 | +0 | +0 | +0 | +0 | +0 | +0 | +0 | +0 | +155 | +0 |
| Chaotic staff | -13 | -1 | +65 | +18 | +0 | +5 | +7 | +4 | +18 | +0 | +0 | +72 | +0 |
| Chaotic crossbow | +0 | +0 | +0 | +0 | +100 | +0 | +0 | +0 | +0 | +0 | +0 | +0 | +0 |
Shields (members only)
A fully recharged shield will last 10 hours in combat. When you buy it, it start at 20% charge. Once you've used up the charges, you will have to recharge it before you can continue using it.
The rewards trader will recharge your shield for a fee. For a shield with no charge at all, a repair will cost up to 2 million gp. If you choose to combine cash and tokens to pay for the reward, it will cost you up to 200,000 gp and a number of tokens.
The shields 'soak' up damage from attacks which would have normally hit for 200 life points. Each of the shield offer protection against different types of attacks:
- The Chaotic shield soaks up 10% of all received melee damage or 20% of all ranged damage.
- The Eagle-eye shield soaks up 10% of all received ranged damage or 20% of all magic damage.
- The Farseer shield soaks up 10% of all received magic damage or 20% of all melee damage.
| Image | Item | Attack bonuses | Defence bonuses | Other | ||||||||||
|---|---|---|---|---|---|---|---|---|---|---|---|---|---|---|
| Stab | Slash | Crush | Magic | Range | Stab | Slash | Crush | Magic | Range | Summon | Strength | Prayer | ||
| Chaotic kiteshield | +2 | +0 | +4 | -15 | +0 | +83 | +90 | +86 | -5 | +89 | +0 | +0 | +0 |
| Eagle-eye kiteshield | -5 | -5 | -5 | +0 | +4 | +50 | +50 | +70 | +25 | +50 | +0 | +0 | +0 |
| Farseer kiteshield | +0 | +0 | +0 | +17 | -15 | +55 | +55 | +55 | +5 | +40 | +0 | +0 | +0 |
Dungeoneering tips
- Always raid floors which you will get prestige for.
- Always bind the best weapon you can get first. If it isn't available in the room with the smuggler, take the time to smith it yourself or have a friend smith it for you. In addition, bind 125 of the best arrows you can use.
- Whenever starting a floor, be sure to buy all the tools needed for the various puzzles and doors. This saves time going back and forth between the smuggler and the rooms. If in a party with other people, split the tools between you. These tools include a pickaxe, hatchet, hammer, tinderbox, knife, fly fishing rod, feathers and on floors 12 and above, antipoisons.
- When needing to give other people items, drop them rather than trading them as this is much faster.
- Use the Dungeon home teleport to travel to the smuggler quickly or to rooms far away. Gatestone teleports can also be used to travel around the dungeon quicker.
- If in need of money, rather than selling items to the smuggler, use high alchemy on them as this will ensure you much more money. Essence can be bought from the smuggler.
- When about to fight a boss and you're unsure whether you can defeat it or not, place a gatestone outside the boss room allowing you a quick escape if needed.
- Always try to play in a party of two or more as this is much more efficient than soloing and also allows you to continue the floor even if you disconnect or have to leave for a short while.
- If unable to open a door due to the high level requirement, a potion can be made. If there are no herbs to be found, seeds can be bought from the smuggler and planted to grow the herb.
- To complete the floor as quick as possible, time is best spent focusing on opening rooms and killing monsters rather than collecting supplies and making armour. This should only be done if the monsters or the boss are too difficult to defeat without more supplies or armour.
Guide credits
Special thanks: Death, Mangleman, Dave
Last update: 30-Sep-2010 13:13 by Aliensvortex