Construction
Intro
Construction is a flexible members-only skill that allows players to build their very own house, and add items such as chairs, tables, decoration etc. to it. Items can be sold to fellow players. Constructing your house is not only fun and easy, but is also beneficial to many other skills like prayer.Construction is by far the most expensive skill in RuneScape. If you want to start training this skill, you should have more than 500K, but for the more serious trainers, millions of GP is advised.
Guide links:
The basics
 Starting
To start building a house, you need to buy a plot of land. This costs 1,000 gp and can be bought from any Estate agent:
• East of the Grand Exchange [map]
![[map]](http://www.global-rs.com/img/ea-varrock.png)
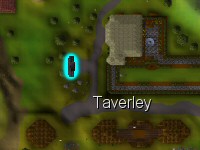
• Falador between the furnace and East bank [map]
![[map]](basics/ea-falador.png)
• Seers' Village north-east of the Bank [map]
![[map]](basics/ea-seers.png)
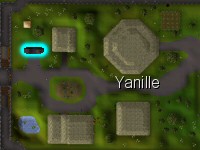
• Ardougne, north-west of the south-eastern bank [map]
![[map]](basics/ea-ardougne.png)
The Estate agent will later provide you with new decoration styles for your house, and he can move your house to another location.
Visiting your house
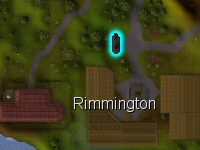
Your first house is located just north of Rimmington. To access it, you have to go through the portal. There will be several options:
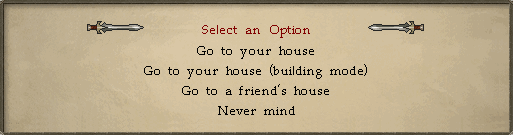
| Option | Use |
| Go to your house | Teleports you to your house. This is the "visit mode", you cannot build in this mode. |
| Go to your house (building mode) | As the name suggests, this teleports you to your house in the building mode. This is the mode you need to be in if you want to build your house. People will not be able to visit your house while it is in building mode. |
| Go to a friend's house | Click this and enter the name of the friend's display name. This friend has to be logged on, have their private chat turned on and be in their house to allow you to enter it. |
Building your house
If you want to enter the building mode while you're in the normal mode, click on the player controls button next to the jukebox button, and select "house options". You can then set the building mode to "on". Note that if you have a bank pin, you will need to enter it before you enter the building mode, unless you have done it earlier in the same log in session.
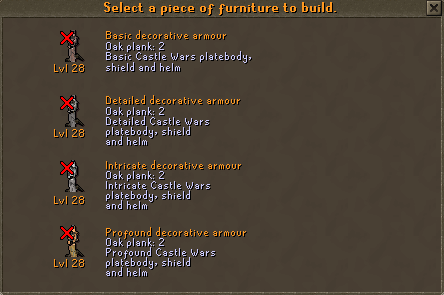
When you have entered your house in building mode, you will see lots of white, semi-transparent "Hotspots". This is where you can build new rooms or furniture.
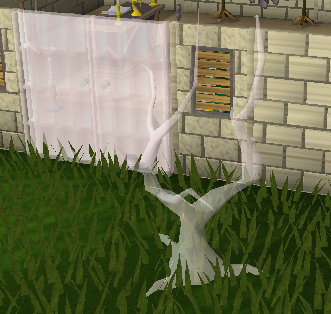
If you select the "build" option on a furniture hotspot, a "furniture creating menu" appears. This one is similar to the menu that appears when you are smithing. The menu shows you the items that can be built, the needed level and needed materials.
If you want to remove a piece of furniture to built a better one or just "power-level", right-click on it and select remove while you're in building mode. Some pieces of furniture can actually be upgraded without removing them first.
Similarly, if you want to make a new room, right-click on one of the door hotspots. A list of rooms appears, and you have to pay a certain amount of GP to make the room. It can also be removed like other objects. If you do remove a room but want it back later you will have to pay the same amount again to gain it back. More info about rooms can be found in the rooms section of this guide.
The construction materials
NOTE: All materials can also be bought from fellow players.
Saw and hammer
The saw is needed when you're using a plank, and you always need a hammer. Hammer obtained from the 10th anniversary Christmas Cracker can be wielded and used in Construction allowing an extra inventory space.. The saw can be bought from the Sawmill operator, located north-east of Varrock. It costs 13 gp.
Nails
 Nails are very important, mainly for lower levels, but are less used when you get higher level.
Nails can be bent when you're using them. Better nails and higher construction level will result in less bent nails.
Nails are made in smithing.
Nails are very important, mainly for lower levels, but are less used when you get higher level.
Nails can be bent when you're using them. Better nails and higher construction level will result in less bent nails.
Nails are made in smithing.Planks
 The planks are also one of the most important materials in your house. There are 4 types of
planks:
The planks are also one of the most important materials in your house. There are 4 types of
planks:• Normal planks
• Oak planks
• Teak planks
• Mahogany planks
Planks cannot be made by players. To make them, get the logs, and go to the sawmill operator located north-east of Varrock. They can also be obtained from the Grand Exchange or from plank hotspots (i.e. the wilderness graveyard)
Cloth
Cloth is needed for curtains, beds etc. You can only get them from the sawmill operator for ~650 gp.
Other items
There are a wide range of other items that are used in construction, such as Limestone bricks, Marble blocks, iron bars, clay etc. Many of these items can be bought from the Stonemason in Keldagrim, and some of them can be made using the smithing skill.
Other info
• If you die in your house, you will spawn outside the portal. You will not lose any items.
• Your portal can be locked by right-clicking on it and select "lock". No-one will be able to enter your house if it's locked.
• If your private chat is set to "friends", only people that are in your friends list can enter your house.
Construction NPCs
There are a few NPCs (Non-Player Characters) in RuneScape that are related to the construction skill.Estate Agents
As mentioned in the basics section, the Estate agents sells you the plot of land where your house is. They are located here:
• East of the Varrock Palace [map]
![[map]](basics/ea-varrock.png)
• Falador between the furnace and East bank [map]
• Seers' Village north-east of the Bank [map]
• Ardougne, north-west of the south-eastern bank [map]
After you gain more levels, you can speak to the Estate agent to move your house to a new location. These are the possible locations:
| Location | Needed level | Price |
 |
1 | 5,000 gp |
 |
10 | 5,000 gp |
 |
20 | 7,500 gp |
 |
30 | 10,000 gp |
 |
40 | 15,000 gp |
 |
50 | 20,000 gp |
Estate agents can also redecorate your house with a new style if you wish:
| Style | Needed level | Price | Wall style | Ground style |
| Basic Wood | 1 | 5,000 gp |  |
 |
| Basic Stone | 10 | 5,000 gp |  |
|
| Whitewashed Stone | 20 | 7,500 gp |  |
 |
| Fremennik-style Wood | 30 | 10,000 gp |  |
 |
| Tropical Wood | 40 | 15,000 gp |  |
|
| Fancy Stone | 50 | 25,000 gp |  |
|
The Sawmill operator, located north-east of Varrock [map], turns logs into planks. However, you have to pay him a small fee.
![[map]](npcs/sawmilloperator.png)
| Picture | Name | Cost |
 |
Plank | 100 gp |
 |
Oak plank | 250 gp |
 |
Teak plank | 500 gp |
 |
Mahogany plank | 1500 gp |
Gardener
The Garden Supplier in the Falador Park [map] sells bagged plants, flowers and trees, which can be planted in your garden.
![[map]](npcs/gardener.png)
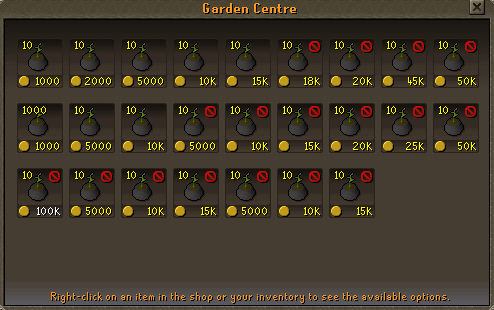
| Name | Price |
| Bagged dead tree | 1600 gp |
| Bagged nice tree | 3200 gp |
| Bagged oak tree | 8000 gp |
| Bagged willow tree | 10,000 gp |
| Bagged maple tree | 15,000 gp |
| Bagged yew tree | 20,000 gp |
| Bagged magic tree | 50,000 gp |
| Bagged plant 1 | 1600 gp |
| Bagged plant 2 | 8000 gp |
| Bagged plant 3 | 16,000 gp |
| Thorny hedge | 5000 gp |
| Nice hedge | 10,000 gp |
| Small box hedge | 15,000 gp |
| Topiary hedge | 20,000 gp |
| Fancy hedge | 25,000 gp |
| Tall fancy hedge | 50,000 gp |
| Tall box hedge | 100,000 gp |
| Bagged flower | 5750 gp |
| Bagged daffodils | 10,000 gp |
| Bagged bluebells | 15,000 gp |
| Bagged sunflower | 5000 gp |
| Bagged marigolds | 10,000 gp |
| Bagged roses | 15,000 gp |
When you gain more levels, you will eventually need Limestone bricks, Marble blocks, Gold leaves or magic building stones. These items can be bought from the Stonemason in southern Keldagrim.

| Image | Item | Cost |
 |
Limestone Brick | 45 gp |
 |
Marble Block | 325,000 gp |
 |
Gold Leaf | 130,000 gp |
 |
Magic Stone | 975,000 gp |
Certain monsters will occasionally drop their head when you kill them (or hand if you're killing a Crawling Hand). If this happens to you, take the head (or hand) to the Taxidermist in Canifis (just south of the General store). She can preserve the head for a small fee so it can be mounted on a wall.
| Image | Monster | Needed level (to mount) | Cost | Stuffed image |
 |
Crawling hand | 38 | 1000 gp |  |
 |
Cockatrice | 38 | 2000 gp |  |
 |
Basilisk | 38 | 4000 gp |  |
 |
Kurask | 58 | 6000 gp |  |
 |
Abyssal demon | 58 | 12,000 gp |  |
 |
King Black Dragon | 78 | 50,000 gp |  |
 |
Kalphite queen | 78 | 50,000 gp |  |
The Herald is located upstairs in the White Knight Castle in Falador [map]. He sells maps, portraits and other decorations for your house. He even amends your Family Crest. When he finds out your family crest, your house decorations will have the crest on it. If you do not like your crest, you can pay him to change it.
![[map]](npcs/herald.png)
Portraits and maps are quest-related, and you have to complete quests to get certain maps or portraits.
The servants
The servants cook food for you and your friends, go to the bank and bring items to help you build, and the best servants can even go to the sawmill and get planks from your logs.To hire the servants, go to the Servants' Guild north of the main square in East Ardougne. Different servants requires different construction levels. They also need to be paid. You have to pay them when you hire them, and then give them their wage on a regular basis. Their wage is the same as the price you hired them for.
| Picture | Name | Needed level | Cost | Abilities |
 |
Rick | 20 | 500 gp | • Takes 6 items to and from bank • Welcomes visitors • Serves shrimps |
 |
Maid | 25 | 1000 gp | • Takes 10 items to and from bank faster than Rick • Welcomes visitors to your house • Serves stew and cups of tea |
 |
Cook | 30 | 3000 gp | • Takes 16 items to and from bank faster than the Maid • Takes wood to the sawmill to get planks • Welcomes visitors to your house • Serves Pineapple pizzas |
 |
Butler | 40 | 5000 gp | • Takes 20 items to and from bank faster than the Cook • Takes wood to the sawmill to get planks faster than the Cook • Welcomes visitors to your house • Serves Chocolate cakes |
 |
Demon Butler (Alathazdrar) | 50 | 10,000 gp | • Takes 26 items to and from bank faster than the Butler • Takes wood to the sawmill to get planks faster than the Butler • Welcomes visitors to your house • Serves Curry |
 Level 1 - Garden
The garden is one of two areas you can build at level 1. When you start
with your first house, you will by default have a garden with a portal. This portal
cannot be removed, as you need to have at least one portal in your house.If you make more gardens, there will be a hotspot called "Centrepiece" where the portal is in your first garden area.
Hotspots:
• Centrepiece
• Big Tree
• Tree
• Small Plant 1
• Small Plant 2
• Big Plant 1
• Big Plant 2
• Room
The items
NOTE: if you're planting, you will gain the same amount of XP to farming too. So if you gain 50 construction XP on a tree, you also gain 50 farming XP.
 Level 1 - Parlour
The parlour is one of two areas you can build at level 1, and it is the first room that you'll be dealing with.
When you enter your house for your first time, there will already be a parlour. It contains 3 chairs around a fireplace and some bookcases.The fireplace can be lit with some logs and a tinderbox, and you can sit in the chairs enjoying the fire but will go out if you leave and then re-enter your house. The bookcases also contains books from your question adventures. from quests you've done.
Hotspots
• Chair
• Rug
• Fireplace
• Curtain
• Bookcase
The items
 Level 5 - Kitchen
Once you reach level 5, you will be able to make a kitchen. Do so by clicking on a door hotspot, and select "Build". Chose the Kitchen,
and then rotate the room as you wish to have it. You will find the kitchen useful for cooking and improve your
Cooking skill. You can even get unlimited supplies
of some of the ingredients!A sink can be built to get water, which can be used to get soft clay, thus helping you in the construction. The larder gives unlimited supplies of a few ingredients, but when you're building better larders, you will get more ingredients. You can also add a barrel, which gives you an unlimited supply of the chosen drink. Lastly, there is a place made specially for your cat. Building larders are one of the best ways to train the Construction skill.
Hotspots
• Cat basket
• Stove
• Shelf
• Sink
• Barrel
• Larder
• Table
The items
 Level 10 - Dining Room
When you have a kitchen, you most likely need a dining room too. Once your reach level 10, you will get the ability to build it. It costs 5000 gp.In the center of the dining room, there is a large table with two benches. You can ask your servant to serve you and your visitors some food here or you can serve it yourself. Like the parlour, you also have a fireplace, and as a new feature, you can now decorate the room too.
Hotspots
• Curtains
• Fireplace
• Table
• Bench
• Decoration
• Bell pull
The items
Level 15 - Workshop
Once you reach level 15 construction, you can build a workshop for 10,000 gp. Unlike the other rooms, you can make items here, thus earning money. The central to this room is the workbench, where you do most of your work.You can make flat-packed items here. This item will use the same materials as the items which would be made normally, and you get the same XP from them, but they are put in your inventory, so you can sell them to other players. This isn't recommended because the selling price is much lower then the price it takes to make the flatpacks. Even if the player doesn't have the required level to make an item, he can set up the flatpacked version on the hotspot.
The repair bench is also very useful. The basic benches allows you to repair broken arrows and staffs, but as your construction level increases, you will even be able to repair your barrows items! This is of course cheaper, but the price actually depends on your smithing level. At smithing level 1, the price will be nearly the same, but at level 99 smithing, it will be almost half the normal cost!
Another important hotspot in this room is the Heraldry hotspot. Here, you can paint your family crest on steel or rune full helms and kiteshields, and even on a banner. Some of these requires quests or levels, while others can be made by everyone.
The last thing you can do here, is clockmaking. Depending on your crafting level, you can make clockwork pieces or toys.
Hotspots
• Tool store
• Repair
• Heraldry
• Crafting table (clockmaking)
• Workbench
The items
Heraldic items
Using the heraldry hotspot, you can make full helmets, shields and wieldable banners in your Family crest colours. You will either need a steel or rune item to make the full helmets and shields, and "normal" construction items for the banners.
Note that the items will look the same, regardless of if it is steel or rune, and you will also earn the same amount of Crafting XP for making them. The only difference is the stat bonuses.
| Image | Item | Needed Crafting level | Materials needed | Earned Crafting XP |
 |
Steel helmets / Rune helmets | 38 |  Steel full helm or Rune full helm |
37 |
 |
Steel kiteshields / Rune kiteshields | 43 |  Steel kiteshield or Rune kiteshield |
40 |
 |
Banners | 48 |   1 Plank 1 Cloth |
42 |
| Crest name | Requirements | Helmet | Shield | Banner |
| Arrav | None | |
|
|
| Asgarnia | None |  |
 |
 |
| Dorgeshuun | Lost tribe quest |  |
 |
 |
| Dragon | Dragon slayer quest |  |
 |
 |
| Fairy | Lost city quest |  |
 |
 |
| Guthix | Level 70+ Prayer |  |
 |
 |
| H.A.M. | None |  |
 |
 |
| Horse | Toy horse in your inventory |  |
 |
 |
| Jogre | None |  |
 |
 |
| Kandarin | None |  |
 |
 |
| Misthalin | None |  |
 |
 |
| Money | Costs 500,000 gp |  |
 |
 |
| Saradomin | Level 70+ Prayer |  |
 |
 |
| Skull | Skulled while talking to Herald |  |
 |
 |
| Varrock | None |  |
 |
 |
| Zamorak | Level 70+ Prayer |  |
 |
 |
Using the Crafting tables (clockmaking hotspots), you can make various clockwork toys. These are made in crafting, so you will earn crafting XP by making them, and you the levels needed will be needed crafting level.
| Image | Name | Needed level | Needed materials | Earned XP | Image (released) |
 |
Clockwork | 8 |  1 Steel bar |
20 | |
 |
Soldier | 13 | 1 Clockwork 1 Plank |
20 |  |
 |
Doll | 18 | 1 Clockwork 1 Plank |
27 |  |
 |
Mouse | 33 | 1 Clockwork 1 Plank |
35 |  |
 |
Cat | 85 | 1 Clockwork 1 Plank |
80 |  |
Guide credits
Written by: Aliensvortex
Guide and images by: Aliensvortex
Special thanks to: 1337Jedi, Mike, Crazyman1975, Hitman, Rebel, Kevin, Illicit_Rage
Last update: 10-Jan-2011 12:58 by Rebel007
Guide and images by: Aliensvortex
Special thanks to: 1337Jedi, Mike, Crazyman1975, Hitman, Rebel, Kevin, Illicit_Rage
Last update: 10-Jan-2011 12:58 by Rebel007