| Sponsors |
|---|
One Small Favour Quest Guide
Difficulty: ExperiencedLength: Very long
Members only: Yes
Reward:
- 2 quest points
- 2 lamps giving 10K XP in skills of your choice (have to be over level 30 though)
- Ability to use gnome glider from/to Feldip Hills
- Key Ring (you can have as many key as you want on the key ring, which uses less space!)
- Ability to make Pot Lids from clay (read more in our Crafting guide)
- Ability to make Guthix Rest (read more in our Herblore guide)
Start:
Yanni Salika in Shilo Village.
Needed skills:
Recommended skills:
- 60 combat
- 43 prayer
- 58 magic and completed the Watch Tower Quest (for watchtower teleport)
Needed quests:
Needed items:
- 4 Steel Bars
- 1 Bronze Bar
- 2 Guam Leaves
- 1 Marrentill
- Hammer
- A pot (can be bought during the quest)
- A Cut Opal
- A Cut Jade
- A Cut Red Topaz (these gems can be mined in Shilo Village)
- Bowl of hot water (Bowl can be made in Crafting. Then, use it on a water source, like a fountain, and finally, use it on a cooking range.)
- Tinderbox
- A Hatchet
- Chisel
- Empty teacup (Can be obtained during the quest)
- 5 Pigeon Cages (Can be obtained during the quest)
Recommended items:
- Decent Armour and good sword (preferably dragon)
- 2 cut opals
- 2 cut jades
- 2 cut red topazes (Opals, Jades and Red Topazes can be mined in Shilo Village)
- Charged Amulet of Glory
- Teleport runes for around 15 teleports
- Boots of Lightness and energy pots are a good idea too.
Walkthrough
For these steps, you will need around 100gp and a Varrock Teleport (optional - you'll have to go from Lumbridge to Varrock).
1. Talk to Yanni Salika, who is south-east of the mining area in Shilo Village. Ask him if there is anything to do, and he'll tell you that he wants you to do a small favour.
2. Go upstairs in the fishing shop, and buy a ticket for the "Lady of the Waves", which you will need soon.
3. Now, exit the village in the southeast corner. (Search the cart that blocks the way, and you'll jump over it.) Now, go southwest, and you'll see a Jungle Forester. Talk to him, and he'll tell you that he needs his axe sharpened.
4. Now, head straight west until you reach the ocean. Climb up the ladder, and you'll find Captain Shanks. Talk to him. He will say that he doesn't want to help, and that you can take it to Brian yourself. Then, ask him to go to Port Sarim.
5. When you're in Port Sarim, go to the Axe Shop, which should be to the west. Talk to Brian, and ask him if he can sharpen the axe. However, his friend is in jail, and he's too worried to concentrate on sharpening an axe. So, you will have to do a small favour for him: Ask Aggie the Witch if she'll act as a character witness for his friend. Then say that you are going to see Aggie.
6. Aggie lives in Draynor Village, north of the bank. She'll tell you that Jimmy the Chisel, her new apprentice, is missing. Say "Let me guess, you're going to ask me to do you a favour?"
7. Now, head to the East to the H.A.M headquarters [map]. Find the trapdoor, right-click on it and select "pick-lock". Once you manage to pick the lock, you can climb down. Now, head to the southeast part of the H.A.M dungeon. There, you'll see a man in darker robes, called Johannus Ulsbrecht. Talk to him, and he'll tell you that he won't release Jimmy before Brother Fred, a farmer, agree to send them one month's supply of chicken.
![[map]](http://www.global-rs.com/img/ham_hq_map.png)
8. Exit the H.A.M dungeon where you entered (the north-west part), and head to the north-east, to the chicken farm. Fred the farmer is walking around there. Tell him that you need to talk about Jimmy. He'll tell you that you should talk to Seth Groats.
9. Follow the path to the east, then go over the bridge, and then go to the north. You should now come to a chicken farm. Enter the building, and you'll see Seth Groats. Talk to him. He'll tell you that you need to talk to Horvik in Varrock.
10. Teleport to Varrock or run if you want to. When you're in Varrock, head to the East Bank, and withdraw these items:
3 Steel Bars, a Pickaxe, a Hatchet, a Tinderbox, 2 Guam Leaves, 1 Marrentill and 1 Harralander, Bowl of hot water. Also, a Falador Teleport and Ardougne Teleport is a good idea.
Also, before going to Horvik, go southeast of the bank to the Tea Stall, steal a Cup of Tea, and drink it. (you'll need the cup later)
11. Head to Horvik, which is north-west of the eastern bank. However, Horvik is a too ill to make anything other than a trade. He'll tell you that he needs a medicine. Also, if you could bring him 5 pigeon cages, it would be fine.
12. Now, head south of the main square, and take the road to the east just south-west of the Clothes shop. You'll come to the Apotechary, talk to him. When he's about to give you the pot, he drops it on the floor and shatters his last airtight pot! So you'll need to make a new one.
13. Now, head west to the Barbarian Village [map]. There, go south to the small bowl icon on the minimap, and you'll see Tassie Slipcast. She tells you that you'll have to see Hammerspike, which is in the Dwarven Mine.
![[map]](http://www.global-rs.com/img/horvik_tassie_map.png)
14. Go west out of the village, then north-west a bit, then west again until you reach the Dwarven Mine entrance [map]. Then, go south, and then west [map], and you'll find Hammerspike. Ask "Have you always been a gangster?". He'll tell you that he wants to be a druid, and asks you to see Sanfew to persuade him to take Hammerspike as an initiate.
![[map]](http://www.global-rs.com/img/barbvillage_dwarvenmine_map.png)
![[map]](http://www.global-rs.com/img/hammerspike_map.png)
Now, either teleport to Falador and walk to Taverley, or walk all the way to Taverley.
15. Sanfew is upstairs in the Herblore Shop in Taverley. Ask him if he accept dwarves. Then, tell him that a dwarf you know wants to become an initiate. He'll tell you to do two favours. One of them is to make a Guthix's Rest.
To make this, follow these steps:
- Use the bowl of hot water in your empty cup
- Add a Harralander to it
- Add 2 Guam Leaves
- Finally, add 1 Marrentill
16. Now, go to the White Wolf Mountain and talk to the Gnome Pilot [map]. Tell him that you have a special tea from Sanfew. Then, you'll tell him that Sanfew wants to go the the Feldip Hills. The gnome tells you that he need a lighter kit for the trip, and he've heard that Arhein in Catherby produces lightweight but strengthened ropes, called "T.R.A.S.H." (abbrevation for "Trible Redundant Aero Super Hawser".
![[map]](http://www.global-rs.com/img/sanfew_gnomepilot_map.png)
17. Now, head to Catherby and talk to Arhein [map], who runs the general store on the docks there.
![[map]](http://www.global-rs.com/img/arhein_map.png)

He will tell you that he need a weather forecast, and a Seer in Seer's Village, called Phantuwti, can do it.
18. Now, head to the Seer's Village, and go to the house just south of the bar [map]. There, ask Phatuwti Fanstuwi Farsight if he can give you a weather forecast. He tells you that he can't produce a weather report for you since he's more concerned about a girl named Petra who has gone missing. He knows that she's inside a cave southwest of your current location. Then, ask what you can do to help.
![[map]](http://www.global-rs.com/img/phantuwti_arhein_map.png)
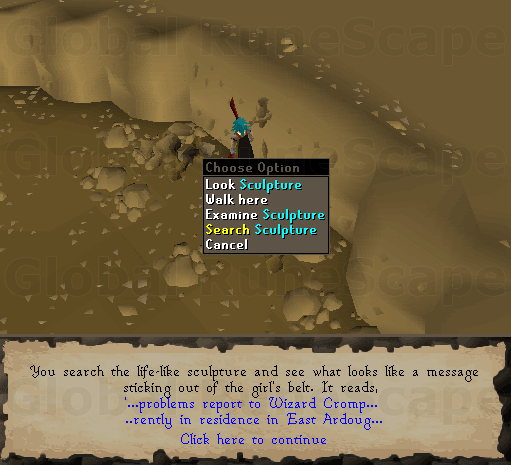
19. The cave Phatuwti is talking about, is the Goblin Cave. This cave is just east of the Fishing Guild, quite close to the entrance [map]. Enter it, go north, and then to the east. You'll see a sculputre, on the easter wall. Search it.
![[map]](http://www.global-rs.com/img/goblin_cave_phantuwti_map.png)
20. Now teleport (or walk) to Ardougne. The Wizard on the message is Wizard Cromperty. His building is north-east of the markeplace [map]. Tell him that you need to talk about a girl stuck in some rock. Then he'll tell you that there is a spell to free the girl, but he need a component for the spell: some iron oxide. This component is found in Port Khazard.
![[map]](http://www.global-rs.com/img/wizardcromperty_map.gif)
21. Now, head south from East Ardougne, down the coastline, until you reach Port Khazard. The Tindel Marchant is on the docks [map]. Ask him about Iron Oxide. He'll give you some for a price of... One Small Favour! You will need to take his mattress to Rantz in the ogre area to fill it with prime chompy bird feathers. You'll get his stodgy matress.
![[map]](http://www.global-rs.com/img/tindel_merchant_cromperty_map.png)
22. Before going to the ogre area, go to the bank in Yanille and withdraw these items:
The gems, some food, chisel.
23. Now, head to the Feldip Hills. Follow the coastline to the south, and go to the east, to the quest start point [map]. Talk to Rantz, who is standing there. You need to talk to him about a mattress. Ask him if he can fill it with feathers.
![[map]](http://www.global-rs.com/img/rantz_map.png)

Well, this means that there is someone banging, and the chompy birds cannot be hunted since they're afraid of the banging, so you'll have to stop it.
24. The person that is banging, is a gnome that is making a glider landing area. He's straight west of Rantz, find him and talk to him (His name is Gnormadium Avlafrim. Tell him that Rantz said that you should come and help him. He'll tell you that he actually need some help, he have some problems with getting the landing lights to work. Search one lamp, and you'll get a gem. Cut it and use it on the lamp again. (Note that if you crush a shilo gemstone, you can just use one of your others that you have in your inventory). Do this on all lamps, and finally, talk to the gnome again.

Now, he won't make any more noise. Go back and talk to Rantz (Yep, you're guessing right! Now, you will finish the quest, follow the chain in reverse!)
So, go back and talk to Rantz again and tell him that you've helped the Gnome.

25. Head back to the Tindel Marchant in Port Khazard and give him the mattress. He will give you the Iron Oxide.
26. Teleport (or walk) to Ardougne, but don't go to the wizard. Then, head to the house behind the norhtern bank in Ardougne, and there is a respawn behind the house [map]. Pick up 5 pigeon cages, and store them in the bank to the north. Also, store (or drop) your remaining gems (if you have any), the chisel. Also, you can store the pigeon cages and you Herbal Tincture (if you still have it) for more inventory space.
![[map]](http://www.global-rs.com/img/ardougne_pigeoncages.png)
Also, withdraw required items to fight a level 96 monster (armour, weapon, food, prayer pots etc). You can also recharge your prayer points at the monastery if it's not full (if you want to use prayer in the fight).
27. Now, go to Wizard Cromperty, and give him the iron oxide. He will then give you an Animate Rock Scroll.
28. Go to the Goblin Cave (east of the Fishing Guild), enter it, go north, then east to the room with the girl in the stone, and then "read" the Animate Rock Scroll. A Slagilith (level 92) will appear. When you kill it, it will drop one adamantite ore, one uncut diamond and one uncut ruby. Then, read the Animate Rock Scroll again, and you'll free the girl.
29. Now, head back to Seer's Village, and go to the bank and deposit the items you used in the fight. Then widthraw these items:
Hammer, a bronze bar, an iron bar and a steel bar.
Now, talk to Phantuwti Fanstuwi Farsight. Tell him that you've released Petra. After lots of speaking, you'll find out that he can't really predict the weather, and the special tool that he's using doesn't work properly. And after more talking, you'll find out that he's talking about a weather vane.

He'll tell you that the weather vane is on the roof.
30. Climb up the ladder, go east and climb up the second ladder. Now, go to the west of the roof. Search the Weathervane, then use the hammer on it. Now, search it again, and you'll get 3 broken vane parts. Now, go downstairs, and then north-east to the anvil. Use the broken vane parts on it, and you'll fix them. (Note that you need the bronze, iron and steel bars). Then, head back to the roof on Phantuwti's house, and use the parts (Ornament, Directionals and Weathervane Pillar) on it. Now, head back to Phantuwti, and tell him that you've fixed the weather vane, and he'll give you the weather report. If you want, you can read it, it really shows his weather reporting skills [image].
![[image]](http://www.global-rs.com/img/onesmallfavour_forecast.gif)
31. Now, head back to Arhein in Catherby with the report. Arhein says he'll send the T.R.A.S.H to the Gnome Pilot.
32. Head to the Gnome Pilot on the Ice Wolf mountain, and ask him if Arhein sent him some T.R.A.S.H. He'll say that he'll already installed it and thanks you. He also agrees to take Sanfew (The yacking old druid) to the Ogre area.
33. Go to Sanfew in Taverley and tell him the Gnome Pilot has agreed to take him to see the Ogres. Also, he has offered to take Hammerspike as an initiate.
34. Preprare for a small fight with the gang members (level 44-49). Then, head to Hammerspike in the Dwarven Mine, and he've apparently changed his mind, and decided that he would make it far better as a gangster than he would as a druid. Then, talk to him again. Now, you will be attacked by the gang members (note that you are in a multicombat area). Now, talk to Hammerspike again. He'll agree to let Tassie alone.
35. Head to Tassie Slipbcast in the Barbarian Village and talk to her. She'll teach you how to make Pot Lids, and she'll also give you some clay to work with. Now, use the clay on the Potter's Wheel, and select Pot Lid. Then, use it on the Pottery Oven.
36. Now, teleport or walk to Varrock, and get a pot: Either widthraw one from your bank or buy one in the general store for 1gp. Then, use the Pot Lid on it, and you'll get an Airtight Pot. Now, go to the Apothecary and tell him that you have an airtight pot for him. Then, he'll give you a pot of Breathing salts.
37. Then, go to the bank and get your pigeon cages and Herbal Tincture for Horvik. Then, head to Horvik and give him the Herbal Tincture the Breathing Salts and the five pigeon cages. He'll modify the cages to chicken cages for you.
38. Head to Seth Groats in his chicken farm and give him the chicken cages. He'll tell you to go and talk to "those fanatics" and let little Jimmy the Chisel go.
39. So, head to the H.A.M. headquarters, and speak to Johanhus (which is in the southeast of the dungeon). He'll agree to release Jimmy the Chisel.
40. Now, speak to Aggie the Witch in Draynor Village. Then, go to Brian in his Axe Shop in Port Sarim. Tell him that you have good news.
41. Head to the Jungle Forester outside Shilo Village and give him his sharpened axe. He'll say that you've been a while, and in fact, he could just have gone and done it himself.
42. FINALLY, return to Yanni and give him his logs! After lots of ranting, he'll give you a key ring, which you can use to store different keys. After even more ranting, he'll give you two "unusual looking lamps".

Guide credits
Special thanks: Chokelius
Last update: 07-Jan-2009 21:27 by Aliensvortex