| Sponsors |
|---|
Regicide Quest Guide
Difficulty: MasterLength: Long
Members only: Yes
Reward:
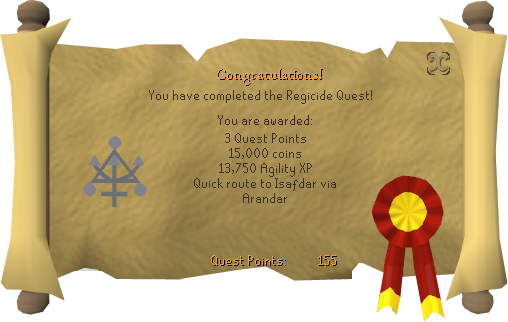
- 3 quest points
- Ability to wield a Dragon Halberd
- 13k Agility XP
- 15k gp
- Ability to wield a Dragon halberd (with 60 Attack and 30 Strength)
- Access to a quicker route to Isafdar via the overpass of Arandar
- Ability to charter a ship from any dock to Port Tyras
Start:
King Lathas' Castle in Ardougne
Needed skills:
Recommended skills:
Needed quests:
Recommended Quests:
- Garden of Tranquillity for Ring of Charos (a)
- Plague City for the ability to use the Ardougne teleport spell (51 Magic required)
Needed items:
- Bow (any type)
- Arrows (any arrow you can use with your bow, can be bronze. Just a few are required)
- Rope
- Plank
- Tinderbox
- One additional rope and plank or 3200 gp or 1600 gp with a Ring of Charos (a)
- At least ten Coal in your bank, preferably more
- Pestle and mortar
- Empty pot (can be obtained during the quest)
- 4 balls of wool or a strip of cloth
- A piece of Limestone (not a Limestone brick)
Recommended items:
- Monkfish or some other food, and a good bit of it would help.
- Antipoison
- Harpoon (with 76 Fishing and 80 Cooking to catch sharks in Isafdar to get additional food if your combat is low)
- Hatchet to chop down trees in Isafdar to cook rabbits.
- Prayer Potion if your Prayer level is low (43 is still the minimum level for protection).
- Teleport runes or tablets to Falador and Ardougne for faster travel.
Walkthrough
A summons
After completion of Underground Pass, you will eventually receive a message (an npc will deliver it no matter where you are, and when seems completely random) requesting your services once again. Read the message and head for King Lathas in Ardougne Castle. He'll have you travel to the western lands to defeat Tyras once and for all.
Speak to King Lathas upstairs in the Palace in East Ardougne, who will tell you what you need to do.
Stocking up
You're going to need a few supplies for this quest, and banking will not be convenient until much later. You'll need to bring:
- At least one rope
- One plank
- Some arrows (bronze is good enough) and a bow
- A large supply of well-healing food (supplies to gather food from the woods is very useful. Bringing a tinderbox and a hatchet will allow you to kill and cook rabbits (with a high enough cooking level) which heal 50 each, or a harpoon to catch sharks from the fishing spot (again, with high enough levels) to the west of the elf camp).
- An antipoison would also be useful
- A prayer potion is also useful if you have low combat/prayer levels.
- You do not need the coal, limestone or balls of wool.
Going through the underground pass
Make your way through the pass following the route you took for the Underground Pass. A quick guide follows (the Underground Pass has a more detailed guide if you get stuck).
- Enter the Underground Pass dungeon west of Ardougne.
- When you reach the swamp, climb over the rockslide on either side of it. Do not try to cross the swamp.
- Speak to Koftik, who will give you a damp cloth. Use it with your arrows, and then use the arrow with the fire.
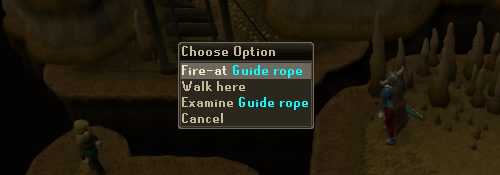
- Go to the platform just north of Koftik, and fire at the guide rope.
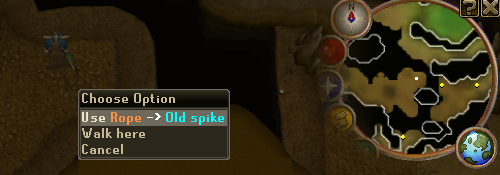
- Continue until you reach a hole. Use your rope with the old spike on the ground to continue.
- Continue through the passageways, and climb over the rockslides that block the path.
- When you get to the grid, you have to cross it through trial and error. Note that the solution will change from player to player, but you the solution will always be the same for you. So never walk on a square that you've failed on earlier, it won't work. It might be a good idea to write down the solution as you may need it later. When on the other side, pull the lever to open the portcullis.
- Continue to the west, and run past the traps (don't stop, or you will take extra damage!)
- Climb down the well.
- Continue to the east until you reach a prison. Pick-lock the cage door of the south-easternmost cell. Use your spade to dig next to the mud.
- Continue through the tunnel until you reach the ledge. Cross it.
- - If you have 50+ thieving, go to the south until you see a cage door. Pick-lock it, cross the swamp and pick-lock the next cage door.
- If not, you'll have to make your way through on the bridges all the way to the east (high agility level helps here). - Go all the way to the south, squeeze-through the obstacle pipe.
- Go just a little to the west and you should see a tunnel entrance, pass through it.
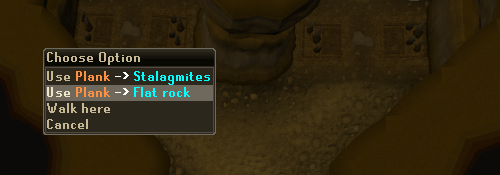
- Continue through the tunnels. Ignore all NPCs. You'll get to a spot with flat rocks. Use your plank with them to cross.
- Go all the way east and open the door.
- Continue to the west, past all the cages, continue to the south until you get to a bridge that doesn't lead to the half-soulless creatures in cages.
- Find your way through the bridges as shown on the map below. (if you fail on one of the obstacles, go all the way to the south and you should see some stairs that lead back up. Then, go to the west, then north until you get back to where the bridge began - it's quite far!).
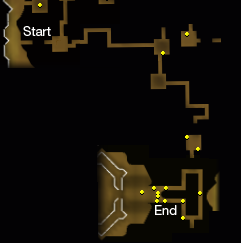
- Open the door. You will see Koftik there. Speak to him to get some food if you need it, otherwise, climb down the well.
Elven Introduction
1. Pray at the altar at the end of the pass if you don't have full prayer points; you'll need them later. Exit the cave, and an elf will greet you.
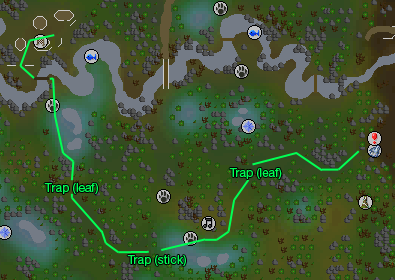
2. Follow the path (see map below), heading southwest and avoiding traps (click the leaf trap to jump over it and click the stick trap to avoid getting hurt), until you reach an elf camp.
3. Before speaking to Lord Iowerth, grab the empty pot in the hut if you need one. Speak with Lord Iowerth, he'll know who you are and why you're there. He'll send you back to the Tracker.

4. To reach the Elf Tracker, go back where you come from, but when you reach the spike trap, continue to the south. The tracker refuses to talk with you.
![]()
5. Go back to Lord Iowerth, and he'll give you a crystal pendant for identification. Head back to the Elf Tracker, who will recognize it, and tell you to check the area to the west.
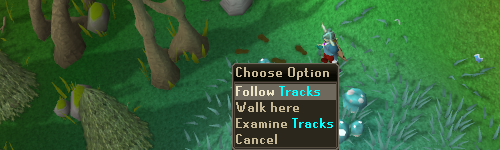
6. Go just west of the tracker, and you should see some tracks. Try following them, then tell the Tracker about them. He'll enable you to pass dense forest.
A Challenger Appears
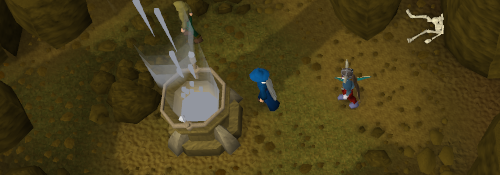
7. You're about to engage in the only real fight of the quest, so be ready. You'll be up against a level 110 Tyras Guard. He has a halberd, so even if you find a usable safespot, he'll be able to hit you. He hits quite well for his level, so protect from melee is recommended. He should go down pretty quickly against decent combat levels. To get to him, pass the dense forest near the tracks you just found.
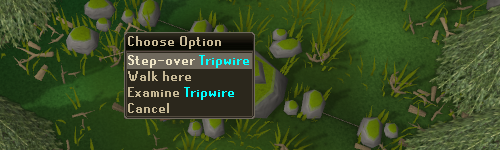
8. Head northwest, and watch out for the tripwire trap! This will damage (100 lp) and poison you (a weak poison hitting 20) if you fail it. Should you fail, just take a sip of antipoison and you'll be good to go.
9. Head through the dense forest and you'll reach a catapult (you will also see a quest start point on the minimap). Continue to the south and go through the dense forest.
10. Speak to General Hining. When you've spoken to him, pick up a few barrels. Head back to the tracker.
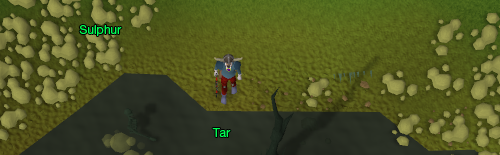
11. Go south from the tracker, and use your barrels on the tar to get a barrel of coal-tar. Then, take a piece of sulphur, and use the sulphur with your pestle and mortar to get ground sulphur. You're going to need these later.
12. Head back to Lord Iowerth (check the map in step 4 if you can't remember the way) and tell him what you've learned, and he'll instruct you to build a bomb. He'll give you a book detailing the construction of such a bomb, read it momentarily (you don't really need to know what's written in it, but for the story to advance you must read the book).
While you're at the camp, kill a rabbit for the upcoming steps. They're located to the northwest, near the fishing spot. Cook it in the camp for convenience.
Don't tell the CIA...
13. Time to build a bomb! The first thing you'll want to do is get to a bank (Falador is convenient since you'll be going to Rimmington). You're going to need:
- An empty pot
- A piece of Limestone (not a Limestone brick)
- Ground sulphur (if you haven't ground it yet, use the sulphur you picked earlier in the quest with a pestle and mortar)
- A pestle and mortar (you need it even if you already have ground sulphur)
- The big book of bangs
- The tar-filled barrel
- As much coal as possible (the more, the better)
- 4 balls of wool or a strip of cloth
14. Head for the chemist in Rimmington; he's in the house with the green Achievement Diary icon. Ask him about your quest, and he tells you to use the fractionalizer outside.
Use the tar on the machine, and operate it. Turn the right valve until the knob is pointing to the right, and turn the left valve until the knob is on the top (wait until the pressure gauge shows in the green). The 4 images below and the text below the images explain step by step how to operate the fractionalizer.
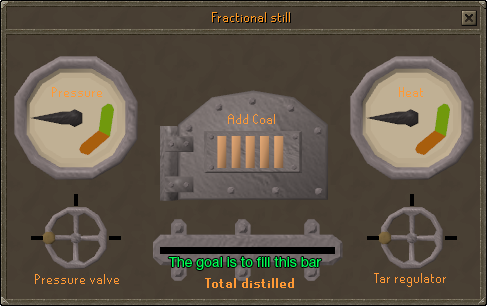 |
Add two or three pieces of coal to start off, and slowly add coal to the machine every few seconds (one piece of coal will greatly increase the temperature. Keep the temperature in the green and white, do NOT add coal if the ticker shows green.). Keep this up until the "amount distilled" bar is completely green. You now have some naphtha.
16. If you have 4 balls of wool and not a strip of cloth, head to the loom south of Falador, near the Farming shop. Use the balls of wool with the loom to make a strip of cloth.
15. Go to any furnace. Use your limestone with it to get quicklime.
16. Making the bomb:
- Use the quicklime on a pestle and mortar (with an empty pot in your inventory). You get a pot of quicklime.
- Use the ground sulphur on the barrel of naphtha. You get a naphtha mix.
- Use the pot of quicklime on the naphtha mix. You get a barrel bomb.
- Use the strip of cloth with the barrel bomb. The bomb will now have a fuse.
I've got a bomb!
Needed items for the next steps:
- Cooked rabbit (if you don't have one, kill a rabbit when you get back to Isafdar and cook it).
- Barrel bomb
- Tinderbox
- Items to get back to Isafdar (see next steps).
- Teleport to Ardougne (recommended, but not needed).
17. Time to use it. You have to go back to Isafdar, and you have two alternatives:
- Recommended: Charter a boat from any dock to Port Tyras (it costs 1600 with an activated ring of Charos, 3200 otherwise). Find the Trader Crewmembers on the docks (for example at the southern pier in Port Sarim, which should be conveniently located). You may also buy a raw rabbit from one of the crewmembers if don't have one!
- If you don't want to spend the money, you can make your way through the underground pass like you did at the beginning of the quest.
18. Make your way to the catapult, located just north of Tyras Camp. Use (don't left-click to eat!) the cooked rabbit on the npc guarding the catapult, he'll leave you in charge temporarily. Use your bomb on the catapult (make sure you have a tinderbox in your inventory) and a cutscene showing the destruction of the camp will commence.
19. Head to the Elf Camp to tell Lord Iowerth the news, he'll give you a message to give to the king and access to a new route into the western lands (you may take this route back to Ardougne, but it is still quite time consuming. Teleporting to Ardougne is recommended.).
20. Once you're back at Ardougne Castle, an Elf will appear with forbidding information. It turns out that you've been working for the wrong side; King Lathas is plotting to bring Lord Zamorak to the realm of RuneScape! You'll be told to return to the king as though nothing unusual has happened. Do this, and the quest will be over. Congratulations!
In addition, you get the following additional abilities:
- Ability to wield a Dragon halberd (with 60 Attack and 30 Strength)
- Access to a quicker route to Isafdar via the overpass of Arandar
- Ability to charter a ship from any dock to Port Tyras
Guide credits
Special thanks: Predator
Last update: 25-May-2010 16:05 by Aliensvortex