| Sponsors |
|---|
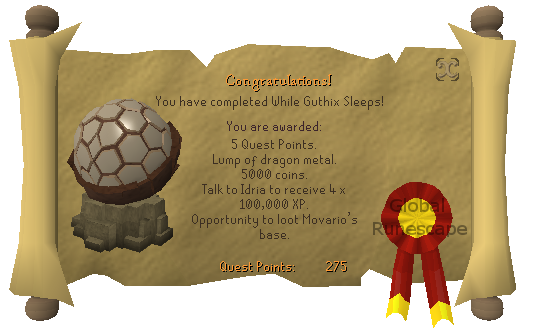
While Guthix Sleeps Quest Guide
Difficulty: GrandmasterLength: Very long
Members only: Yes
Reward:
- 5 quest points
- A lump of dragon metal
- 5000 coins
- 4 x 100,000 xp in any skill level 65 or above
- The ability to loot Movario's base
Start:
Speak to Radimus Erkle in the Legends' Guild.
Needed skills:
- 23 Summoning
- 55 Hunter
- 60 Thieving
- 65 Defence
- 65 Farming
- 65 Herblore
- 75 Magic
- 270 Quest Points
- Be eligible for entry to the Warriors' Guild
- Have defeated Bork in the Chaos Tunnels
Needed quests:
- Defender of Varrock
- Dream Mentor
- Hand in the Sand
- King's Ransom
- Legends' Quest
- Mourning's Ends Part II (The Temple Of Light)
- Path of Glouphrie
- Recipe for Disaster
- Summer's End
- Swan Song
- Tears of Guthix
- Zogre Flesh Eaters
Needed items:
- Hatchet
- Knife
- Ring of Charos (a) or 5000 gp
- Teleport runes
- One air, mind, water, earth or fire rune (varies for each person)
- 30 of any elemental rune - air, water, earth, fire.
- 3 cosmic runes
- Unpowered orb
- 1 law rune
- 1 death rune
- Snapdragon seed or 29,000 gp
- Seed dibber
- Sapphire lantern
- Lantern lens
- 5 gp
- Charcoal
- Papyrus
- Bronze med helm
- Iron chainbody
Walkthrough
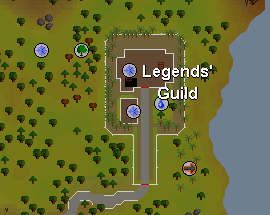
1. Speak to Radimus Erkle in the Legends’ Guild which is located northeast of Ardougne. He tells you that he has a quest for you and explains that the druids intend to set up an altar to Guthix on Karamja. Accept the mission and Radimus tells you that you need to talk to a druidess called Ivy Sophista in Taverley, who can be found in one of the buildings opposite the witch’s house. He then gives you a secret pass phrase to tell Ivy – ‘Our friend in common places great faith in totems.’
2. Head over to Taverley and enter the long building just south of the witch’s house. Talk to Ivy Sophista and pick the option ‘Our friend in common places great faith in totems.’ She then tells you to meet Thaerisk upstairs.
3. Climb the ladder at the east end of the house and speak to Thaerisk. He tells you that the trip to Karamja was just a cover story and he’ll start to give you the background story. However you’re interrupted by two level 38 assassins. Kill them and then resume talking to Thaerisk.
4. Ask him ‘What efforts are you making against Lucien?’ then ‘What are our options?’ followed by ‘What do you need me to do?’ He needs you to go find out what Movario is up to. Thaerisk tells you to go see Reldo in the Varrock Library to find out about what Movario may be doing.
The hunt for Movario
Needed Items: Knife, hatchet or any type of log
5. Speak to Reldo and ask him about each of the options in turn. After asking where he lives, Reldo suggests you speak to a jungle hunting expert.
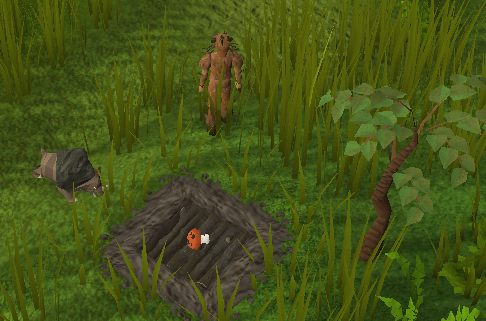
6. Go to the Feldip Hills south of Yanille and talk to the hunting expert about a creature to help track down a person. She will talk to you about the wild broav and explain how to catch it. She then gives you a mort myre fungus to use as bait. You’ll need a knife and an hatchet or any type of log.
7. Head west to the designated pitfall trap. Catching the wild broav is very similar to pitfall trapping. the only difference being you’re using bait and don’t need to jump over the trap. Set the trap and then place the fungus on it. The wild broav will approach and then fall into the trap. Bring the unconscious broav back to the hunting expert.
8. She trains the broav for you but you’ll need to find something of Movario’s to let the broav get his scent. Go to the Khazard area.
9. Talk to one of the Khazard guards and they will tell you that he Movario is often seen taking his laundy somewhere northwest of the Fight Arena. Go there and ask the Khazard launderer if he knows someone called Movario. He says he isn’t allowed to divulge client details so pay him 5000 gp or charm him with a ring of charos(a). You’ll receive some of Movario’s dirty laundry.
10. Drop your Broav and use the dirty laundry with it. It will lead you to the Khazard ruins at the battlefield. If your broav starts walking in circles use the laundry with it again or if it gets stuck behind obstacles just pick it up and walk around the obstacle. It will lead you to the northern area of the khazard battlefield in the northeastermost house. The door is locked so climb the crumbled wall to get in.
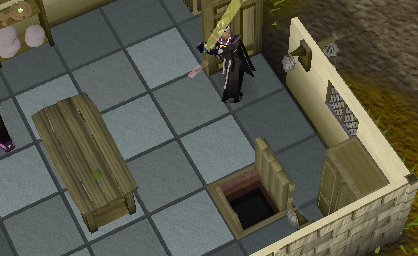
11. Once inside the building use the laundry on the broav again and it will walk over to the broken table and squeal. Search the table to find the trapdoor beneath it.
Movario's Base
Needed Items: 1 air, mind, water, earth and fire rune, food
12. Bringing 1 air, mind, water, earth and fire rune, enter the trapdoor and then head west. At the intersect run north and follow the path as it curves until you reach the stairs. Go down them and you’ll find yourself in a room that prevents you from teleporting.
13. Use the mind rune on the door. If it’s the correct rune then you receive a message saying you hear a click. If it’s the wrong rune you get blasted for 250 life points. Take note of the colour as that will indicate which rune is the correct one. White is air, blue is water, green is earth and red is fire. Do not open the door. Search the door now and disarm the traps. Open the door and enter the next room.
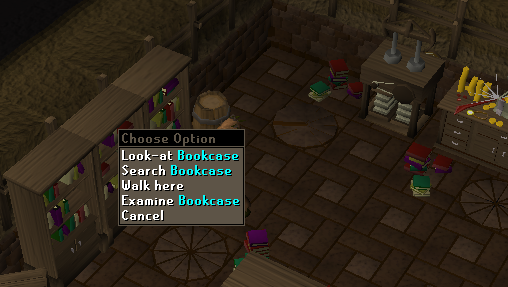
14. The aim here is to divert all the electricity to the gate to overload it. Go over to the gate and find the lit wire. It’ll be slightly illuminated and vibrating. It can be examined if you’re unsure. Follow the wire and search the bookcase it leads to. This will then light up another wire. Keep doing this until all the wires are lit up and then open the gate and search the stairs before going up.
15. Search the desk to find Movario’s notes and the pick up the waste basket and search it to find a ruby key. Use the ruby key with the northernmost bookcase on the western wall. A staircase will appear, climb it.
16. Search the bed to reveal a bed chest. Search the chest and disarm the trap and then use the ruby key on it. Searching the chest will yield two key halves and more of Movario’s notes. Head all the way downstairs to the room with all the wires.
17. Search the painting on the eastern wall and flip the catch. Search the drawers and look at the thermometer. Check your own weight and take away the number on the thermometer. Then take that weight from the pile and go upstairs. Use the weights on the statue and open the door. Run east until you get to the ladder and then climb it.
18. Go back to Thaerisk in Taverley. Hand him the notes and then ask him what you should do now. He tells you to find out where Lucien is from the Guardians of Armadyl. Head over to the shack by McGrubor’s Woods.
Needed Items: Armour, weapon, food
19. You’ll see a cutscene where Lucien’s mercenaries (two level 88 axemen and a mage) attack the Guardians of Armadyl. When it’s over help the Guardians kill the mercenary axemen and the mage will teleport. Talk to the wounded Guardian. He tells you to find and protect Idria, who is in the arms of a forester before losing consciousness. It turns out that the pub in Seer’s Village is called The Forester’s Arms.
A Combined Effort
20. Go to the pub, head upstairs and talk to Idria. Ask her how to get to Lucien and you’ll sketch a plan to infiltrate Lucien’s spy network and you suggest that the Temple Knights could help. Go to Falador and talk to Sir Tiffy Cashien in the park.
21. Sir Tiffy Cashien tells you to talk to Akrisae Kolluym who can be found in the eastern area of the ground floor in the White Knight’s Castle. After discussing how to catch the spy you’re handed a Teleorb to plant on the spy. Ask how to get to Draynor and Akrisae will teleport you there.
Of Spies and Lies
Needed Items: Snapdragon seed/29,000 gp, 5 gp
22. The stranger can be found just in the area south and east of the bank. Use the orb on him until it’s planted. Return to the White Knight’s Castle.

23. Talk to Akrisae and he’ll activate the Teleorb. The spy is teleported to the prison but when he’s being given the truth serum he knocks it over. Speak to Thaerisk who’ll explain you need to make a new serum. First you need to get a snapdragon seed and then talk to Betty in Port Sarim. Either get your own or buy the seed from Thaerisk for just less than 29,000 gp. Then ask him to teleport you to Port Sarim.
24. Go to the magic shop and talk to Betty about While Guthix Sleeps. She explains you have to use an enriched snapdragon herb on a normal truth serum. To do this give the snapdragon seed to Betty and she’ll place it on the counter. Then buy pink dye and use it on a lantern lens. Finally stand in the doorway and use the lens on the counter. Go back to Thaerisk.
25. Ask Thaerisk what to do next and he tells you that you need to plant the seed in a specially created patch on the roof of the castle. Climb to the top of the western tower. Now return to Idria.
26. Speak to Idria to discover that she wants you to assemble a group of heroes to take on Lucien – Turael, Hazelmere, Duradel and Mazchna.
- Turael – found in Burthorpe
- Hazelmere – found in the tower east of Yanille
- Duradel – found in Shilo Village
- Mazchna – found in Canifis
The three slayer masters can be contacted using Lunar Magicks. The fairy ring code to get to Hazelmere is CLS. After having recruited them all head back to Idria.
27. Idria asks you to go check on the snapdragon herb. Pick the herb, use it with the truth serum to make the super truth serum. Bring charcoal and papyrus for the interrogation and then us the serum on the prisoner. He’ll refuse the first two options no matter which you pick and then accept the third one. As you interrogate him you’ll start drawing a sketch of Dark Squall. Give the sketch to Idria.
28. Idria then asks you to recruit another four warriors: Ghommal, Sloane, Harralak and Cyrisus. Ghommal, Sloane and Harralak can all be found in the Warrior’s Guild and Cyrisus can only be contacted using Lunar Magicks with the Contact NPC spell. When they’ve all been recruited return to Idria who tells you to speak to Akrisae.
Rescuing Silif
Needed Items: Armour, prayer potions, two forms of attack
29. Akrisae tells you that he’s anxious to find out what’s happened to Silif who was following Dark Squall. He sends you to the Black Knight’s Fortress to investigate.
30. To get into the fortress you’ll need to wear an iron chainbody and a bronze med helm. Once inside walk north through the wall and head down the ladder. Use any charge orb spell on the different tile to reveal a trapdoor. Go down the ladder.
31. Run north and cross the bridge by clicking on the other side of it. The run northeast and climb the wall. Head slightly north and there’s a safe area where you can catch your breath. You may choose to kill the knights here to get the armour as they only use melee. Now head north again and you can jump the barricade. Jump it, head west and then take the northernmost path to the solid black door and enter it.
32. Use the desks as safespots and kill the three knights to get the platebody, platelegs and full helm and prevent being attacked. Now search the study desk just east of the door you came in to find a strange teleorb and the study desk slightly north of that for a lobster and a restore potion. North of the study desk there’s a keyrack, search it and then exit the room via the door.
33. Head east (not the path with the door) to find Silif in one of the jail cells. Speak to Silif then enter his jail cell. Give him the restore potion followed by the lobster and ask him if he has a plan and then give him the black armour.
34. Search the wardrobe to the east of the door to get a set of Dagon’hai robes. The walk over to the map board and talk to Silif. He gives you another teleorb to plant on Dark Squall while he tries to memorise the maps and you agree to meet back in Falador.
35. Use the teleorb on Dark Squall who will recognise you and reveal that he’s Surok. He orders his guards to attack you. Teleport and return to the White Knight’s Castle.
Deception
Needed Items: Dagon'hai robes, strange teleorb, 1 death and law rune, teleport
36. Speak to Akrisae and he’ll explain to you that he needs you to pretend to be Surok to get into Lucien’s base. Bring the strange teleorb, a death rune, a law rune and a teleport. Then wearing the full Dagon’hai robe top, bottom and hat walk into the cell. You’re teleported back to Surok’s base.
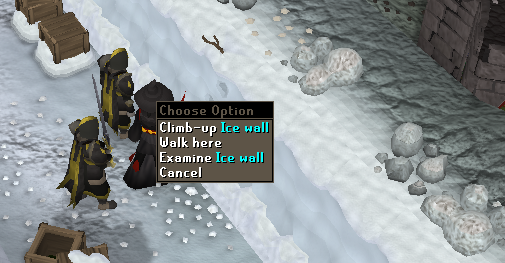
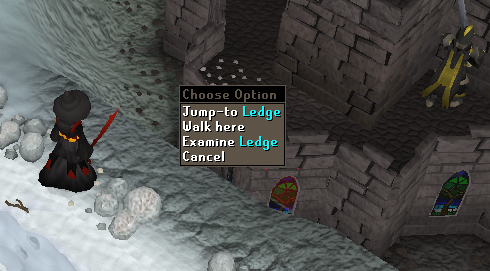
37. Go up the ladder in eastern room and stand in the centre of the circle. Then activate the teleorb. You will be teleport to a snowy area. Take the northeast path and climb up the ice wall.
Then click the ledge on the chapel to jump to it and walk around to the other side of the chapel.
38. A cutscene now follows where Lucien starts to summon his army of undead. He then spots you and realizes you aren’t Surok and tries to kill you. However the heroes that you recruited earlier intervene.

Lucien kills six of the eight heroes seemingly with ease before teleporting. Run back and jump over to the snowy area and then teleport. Return to the White Knight’s Castle and speak to Idria.
Treasure Hunting
Needed Items: Dagon'hai robes, sapphire lantern/chisel, sapphire, bullseye lantern, prayer potions
39. She tells you that Movario has moved to the Lumbridge swamp caves. Dress as Surok again and go to the Lumbridge basement. Squeeze through the hole in the wall and then head south to squeeze through another wall. The head south again, across the stepping stone and enter the tunnel by the giant frogs. You’ll find Movario with a group of cave goblins.
40. Speak to Movario and say that you’re Surok. After being convinced he explains his latest discoveries and needs you to attract one of the light creatures to take you to the bottom of the chasm to find the ‘Stone of Jas’. Use a sapphire lantern on one of the light creatures to attract it, select into the chasm and then Surok will use a spell to make the light creature carry you down.
41. Once down search the skeletons nearby to find 6 druid pouches, a blessed sickle, a hammer, a chisel and a spade. Use the spade on the rock nearby and then use the chisel on it to find a fire orb. Head west and do the same to the other rock to find an earth orb. Now use your chisel on the glowing braziers slightly to the south to receiver an air and a water orb. Head south.
42. You will see four large skulls carved into the wall.
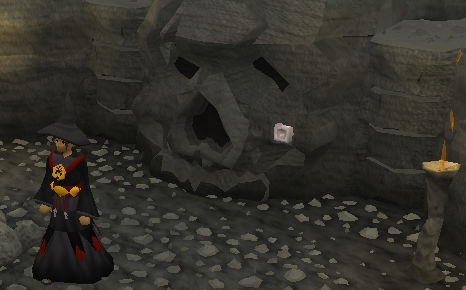
Examine the recessed block in each to find out which orb goes in which. Use the orbs on the blocks to receive metallic cubes. Now enter one of the nose cavities and crawl to the end of the tunnel. Examine the door lock to find out which metallic cube needs to be inserted. Do the same with the other nose cavities. Use the remaining cube on the skull on top of the ledge. Search the stone cube to open the skull’s mouth and follow the path till you reach a large room.
43. You’ll see several paths leading off from the room into different direction. At the end of each path there’s a statue and along the paths there are ghost druids. Examine the statue at the end of a path to find out which potion it depicts. Then use your druid pouches on the ghost druids to release them and they’ll leave potion ingredients behind. Use the potion ingredients matching the correct statue to receive a dolmen. Once you have all 8 go back to the large room and use the dolmens on the stone table. Be careful you don’t fill you druid pouch with the mort myre fungus.The barrier is now removed. Head to the bank and get good armour, food, two attack methods (eg. melee and range) and super restore potions before returning. Note that the Dagon'hai robes won't be needed to get back.
Needed Items: Good armour, two forms of attack, high healing food, super restore potions
44. Head past the barrier that was opened and you will eventually reach a giant stone.
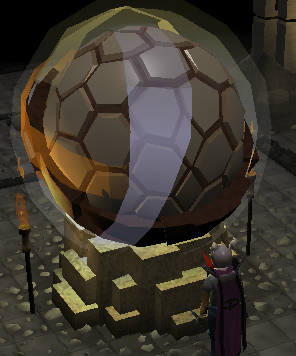
Touch it and a balance elemental (level 454) will appear and attack you. It uses all thee forms of attack. It uses it's fists for the melee attack, wields a flaming bow for the range attack and hurls rocks at you for the magic attack. Just try to change prayer quickly and use a super restore dose every time you get hit. The balance elemental has a very low amount of life points so the fight should be over quickly.
45. Touch the giant stone again to start a cutscene and then Movario and Darve will appear. Question Movario until Lucien appears. After questioning Lucien he summons two level 450 tormented demons. Touch the Stone of Jas to boost all your combat stats to 255. The demons will use prayer so just use a different form of attack from their prayer.

Once the demons have been killed talk to Idria and ask her to teleport you back to Falador. Talk to her again in the castle to complete the quest.
Extra Info
- The two key halves found in Movario's base can be used on a Mithril Dragon to fuse them into a Dragonkin key. The key can then be used to open the mithril door. Cast fire wave on each of the three dragon heads inside the room to fill the stone basin with lava. The dragon platebody can be smithed here if you have all three dragon metal pieces and 92 smithing.
- Movario's base can be looted on the second floor, south of the staircase. There are 100 magic logs, coal, death runes and fire runes there.
- The tormented demons can be fought again for a rare drop of more dragon metal and dragon claws.
Guide credits
Last update: 14-Aug-2012 08:18 by Mike